Quickstart
Welcome to Harness Chaos Engineering! This guide will help you set up your first chaos experiment and execute it on your target infrastructure in just a few minutes.
Before You Begin
Review the following:
- All about chaos engineering
- What's supported
- Ensure you have access to a Kubernetes cluster, Linux machine, or cloud environment
Prerequisites
- Harness Account: Sign up for free if you don't have one
- Target Infrastructure: Kubernetes cluster with kubectl access, or Linux machine with admin privileges
- Basic Permissions: Admin access to your target infrastructure for installing chaos agents
Step 1: Access Harness Chaos Engineering
- Sign up or log in to your Harness account
- Navigate to the Chaos Engineering module from the left sidebar
- Create a new project or ask your administrator to add you to an existing project
Step 2: Create an Environment
A chaos experiment is executed in an infrastructure that is associated with an environment.
- Navigate to the Environments page and select New Environment
- Specify the environment name, description (optional), and tags (optional)
- Select the environment type: Production or Non-Production
- Select Create to add the new environment
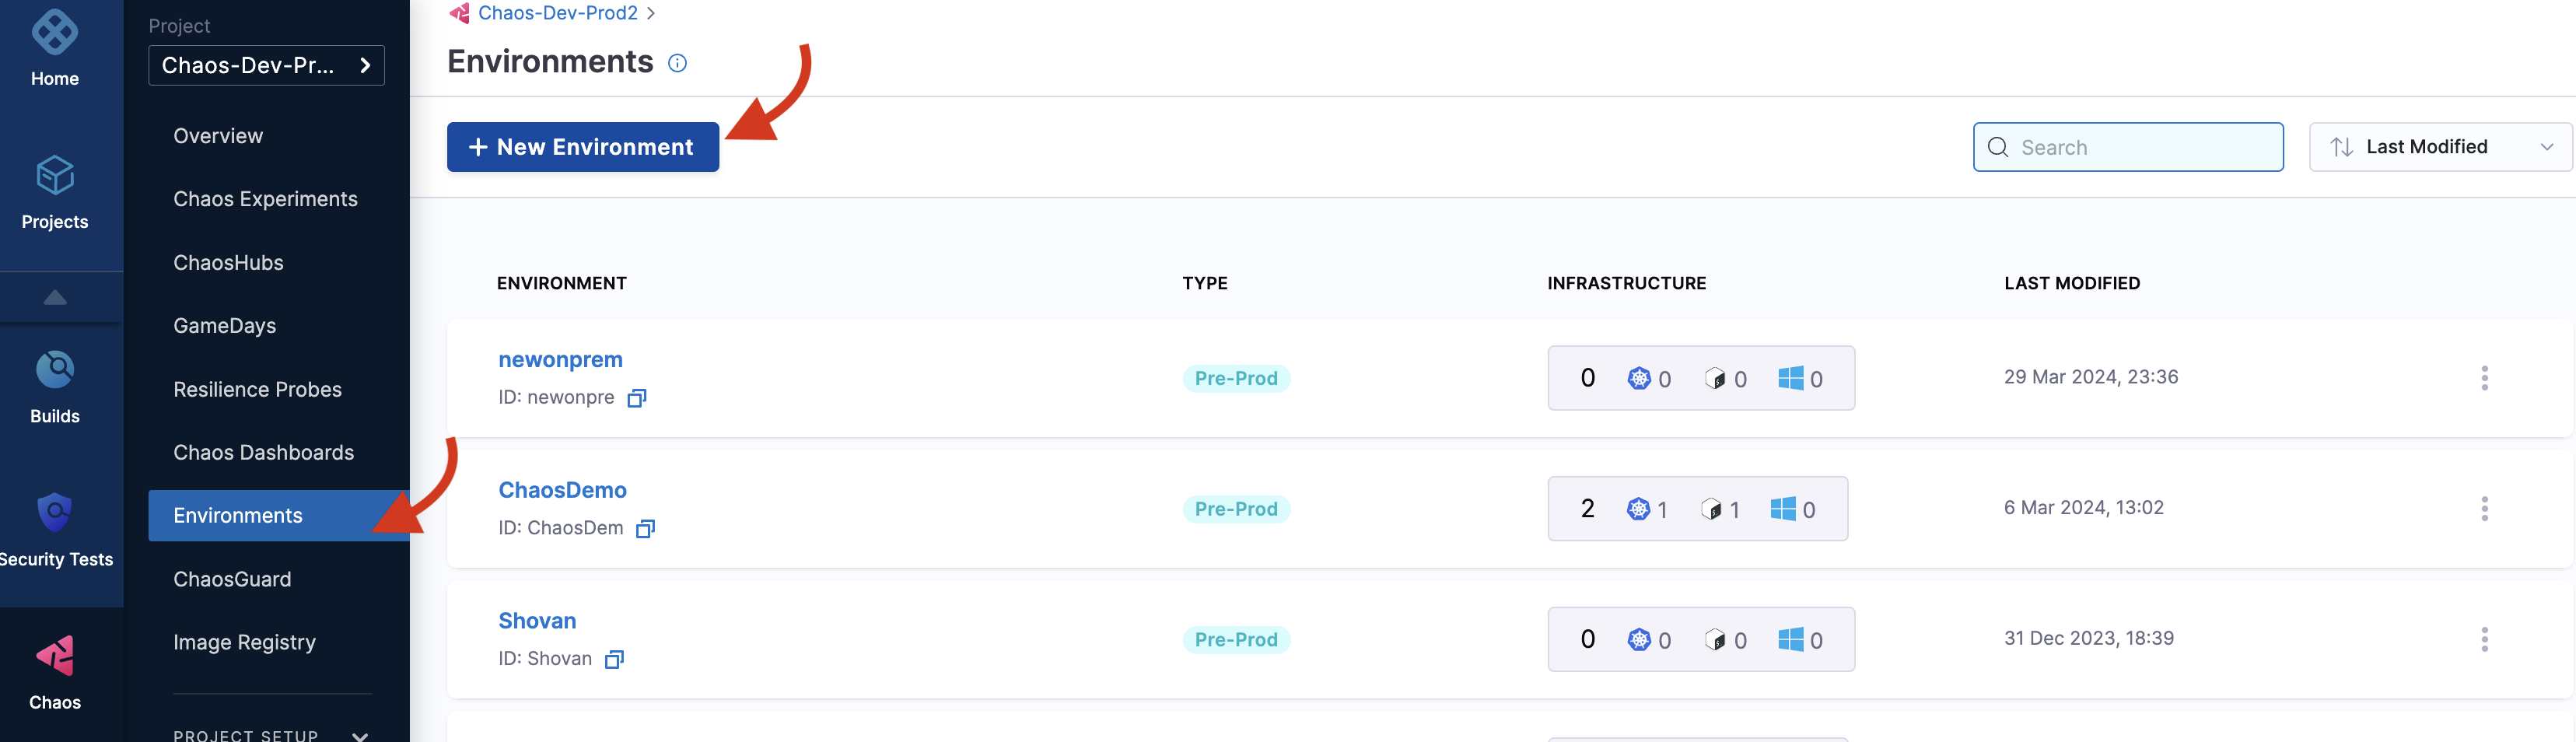
You can also select one of the existing environments from the list if available.
Step 3: Set Up Chaos Infrastructure
After creating an environment, add an infrastructure to it:
For Kubernetes (Recommended for First Experiment)
- Select +New Infrastructure in your environment
- Choose Kubernetes as the infrastructure type
- Select installation mode:
- Cluster-wide access: Target resources across all namespaces
- Specific namespace access: Restrict chaos injection to specific namespace
- Copy and run the provided installation command in your cluster:
# Example installation command (use the one provided in UI)
kubectl apply -f https://app.harness.io/chaos/delegate/manifest/...
- Wait for the infrastructure to show CONNECTED status
For Linux
- Select +New Infrastructure and choose Linux
- Download and install the chaos agent:
# Download the agent
curl -O https://app.harness.io/chaos/linux-agent
chmod +x linux-agent

# Install with your infrastructure ID and access key
sudo ./linux-agent --install --infra-id=<YOUR_INFRA_ID> --access-key=<YOUR_ACCESS_KEY>
Step 4: Create Your First Chaos Experiment
Now let's create and run your first chaos experiment. We recommend starting with Pod Delete as it has a small blast radius and is safe for most applications.
Identify Your Target
- Identify the microservice in your application that you will target
- For Kubernetes, we'll delete a pod from your application
- Pod delete is the simplest chaos experiment recommended as the first step

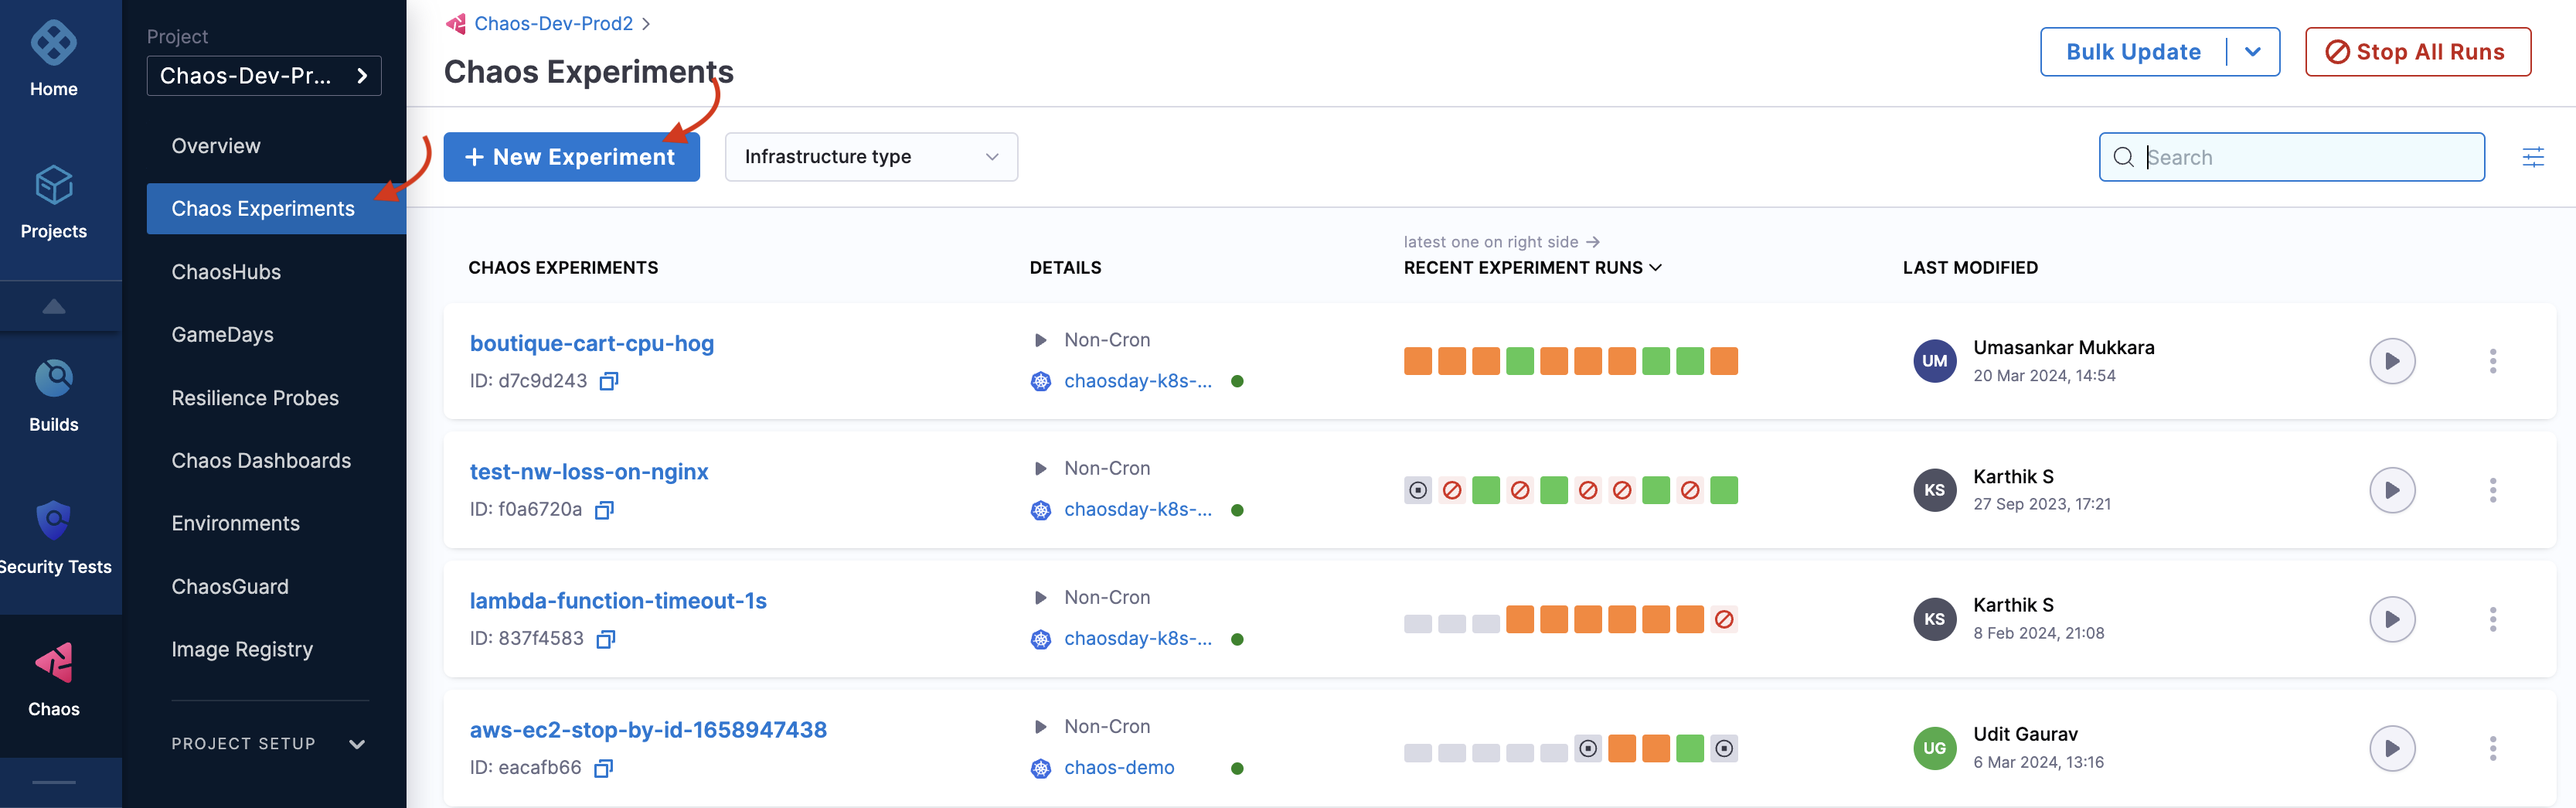
Create the Experiment
- Navigate to Chaos Experiments and select New Experiment
- Choose Blank Canvas to create from scratch, or select a Template
- Configure your experiment:
- Name: "My First Pod Delete Experiment"
- Description: "Testing pod resilience"
- Tags: Add relevant tags for organization
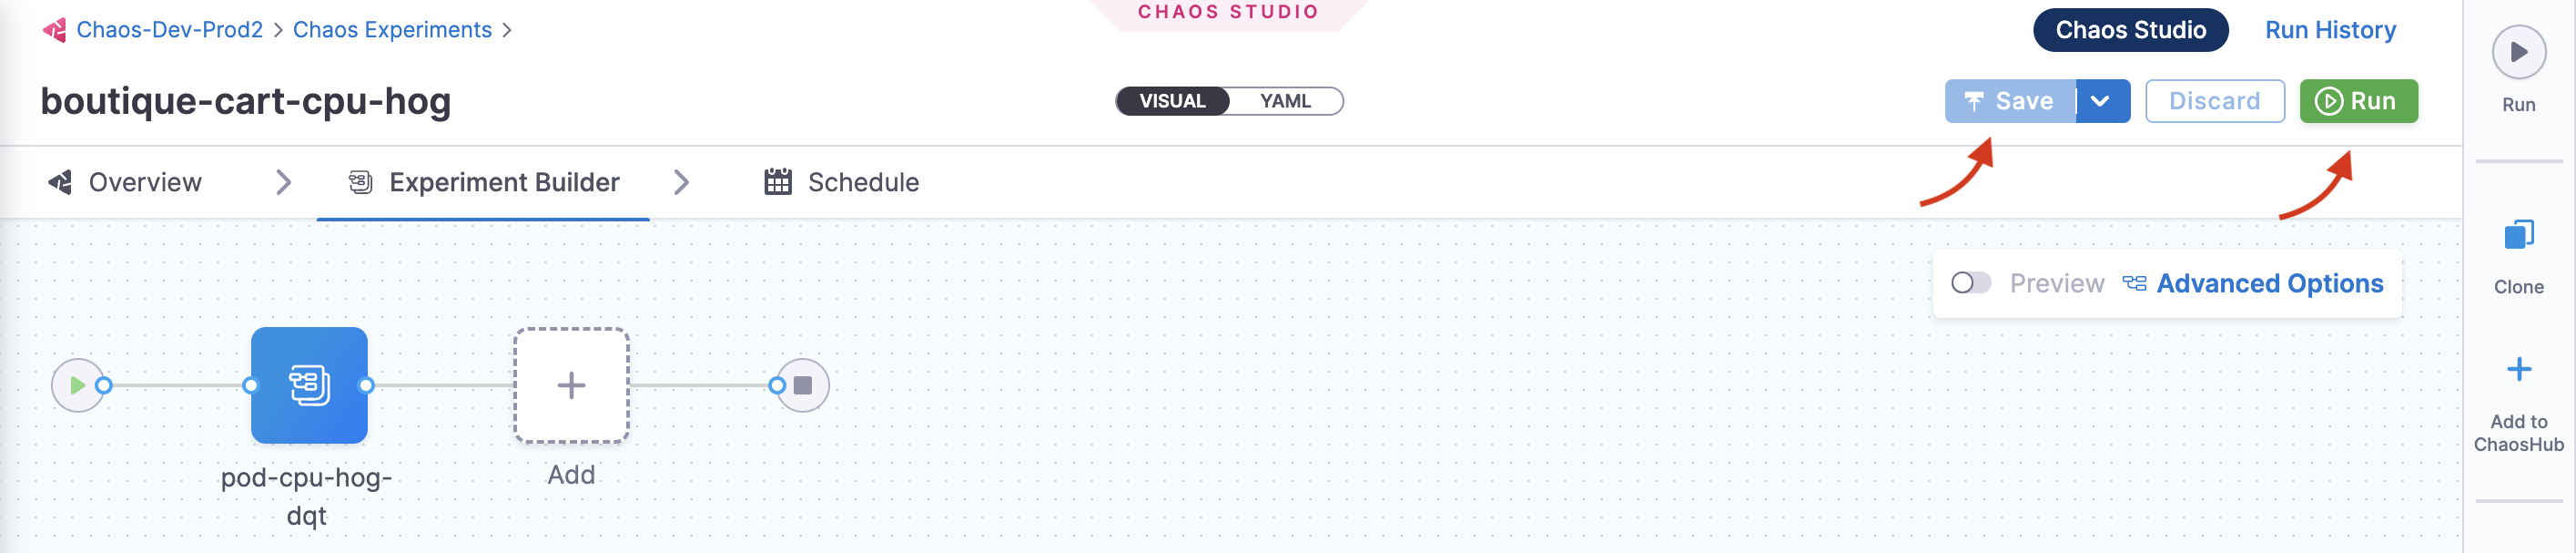
Add Chaos Fault
- In the experiment builder, select Add Fault
- Choose Kubernetes → Pod → Pod Delete
- Configure the fault:
- Target Pods: Select specific pods or use label selectors
- Chaos Duration: Start with 30 seconds
- Force: Keep as false for graceful deletion
Add Resilience Probes (Recommended)
Probes validate your hypothesis during the experiment:
- Select Add Probe in your experiment
- Choose HTTP Probe to monitor application availability:
- URL: Your application endpoint
- Method: GET
- Success Criteria: Response code 200
- Run Properties: Execute during chaos
Step 5: Run Your First Experiment
- Review your experiment configuration
- Save the experiment
- Run the experiment by clicking the Run button
- Monitor the experiment execution in real-time:
- Watch the experiment timeline
- Observe probe results
- Check system metrics and logs
Step 6: Analyze Results
After the experiment completes:
- Review the Resilience Score: Overall system resilience rating based on probe results
- Check Probe Results: Success/failure of health checks during chaos
- Examine Timeline: Detailed view of experiment execution phases
- View Logs: Detailed execution logs for troubleshooting
Understanding Results
- Passed Probes: Your application handled the chaos well
- Failed Probes: Areas that need improvement
- Resilience Score: Higher scores indicate better resilience
Quick Onboarding Options
If you want to get started even faster, Harness CE offers two onboarding methods:
Automated Onboarding
- One-click setup: Automatically creates environment, discovers services, and runs experiments
- Minimal decisions: HCE handles most configuration automatically
- Quick results: See resilience scores within minutes
Guided Onboarding
- Step-by-step guidance: Walk through each step with options
- More control: Customize each step while getting guidance
- Learning focused: Understand the process while being guided
To access onboarding, go to Chaos Engineering → Overview → Select a cluster
Common First Experiments
1. Pod Delete (Kubernetes)
Purpose: Test application resilience to pod failures
- Fault: Pod Delete
- Duration: 30 seconds
- Success Criteria: Service remains available, new pods start quickly
2. CPU Stress (Linux/Kubernetes)
Purpose: Test application behavior under CPU pressure
- Fault: CPU Stress
- CPU Load: 80%
- Duration: 2 minutes
- Success Criteria: Application performance degrades gracefully
3. Network Latency
Purpose: Validate application behavior under network delays
- Fault: Network Latency
- Latency: 100ms
- Duration: 1 minute
- Success Criteria: Timeouts handled gracefully
What's Next?
Congratulations! You've successfully run your first chaos experiment. Here's what to explore next:
Expand Your Chaos Engineering Practice
- Explore More Faults - Try different types of chaos faults
- Advanced Probes - Set up comprehensive monitoring
- GameDays - Organize team chaos engineering events
- CI/CD Integration - Automate chaos testing in your pipelines
You've completed your first chaos experiment! You're now ready to build more resilient systems through systematic chaos engineering practices.