Explore How Feature Flags Affect User Targeting
This demo is a learning exercise designed to help you visualize how feature flag targeting rules behave under different conditions. It uses a simplified application and configuration to make targeting logic easy to observe and reason about.
It is not required for setting up Feature Management in a production environment, and does not reflect a typical production implementation.
The Split Boxes demo is a visualization tool that helps you understand how feature flag rules interact with user targeting. Each box represents a unique user, allowing you to explore how individual targeting, custom attribution, traffic limits, and dynamic configurations affect flag evaluation.
You can target users individually or in groups by defining targeting rules based on their attributes. For example, you might target a specific user by referencing a single cell (such as b8 or j5), or define a segment that includes multiple values.
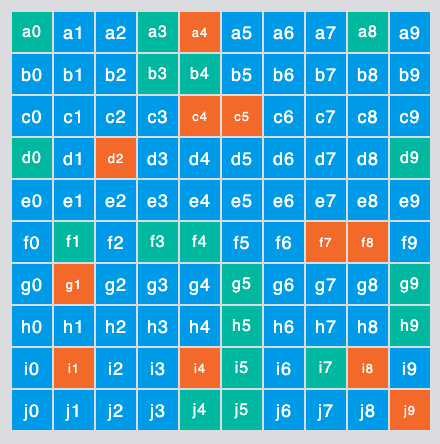
Each box represents a unique user ID in a grid-based layout, and the following targeting attributes are supported: row, col, or account.
| Attribute | Description |
|---|---|
row | Alphabetical row identifier (typically matched using is in list). |
col | Numeric column identifier (typically matched using is in list). |
account | Simulated account name associated with the user. Valid account names include: Nike, Apple, LinkedIn, Best Buy, Google, Microsoft, Pinterest, Dell, Slack, Zoom, Samsung, and Disney. |
You can also modify treatment configurations dynamically in the HTML file. For example, the font_size configuration expects standard HTML size values such as medium, large, or x-large.
Setup
The Boxes demo consists of three files that work together to create and evaluate a feature flag locally.
- CreateBoxSplit.sh.zip: A script for creating the feature flag using the Admin REST API.
- Boxes_split.txt: A text file that contains a baseline definition of the feature flag.
- Boxes.htm: An HTML file that includes the SDK and can be run locally or hosted on a server.
In the HTML file, provide the browser API key and the feature flag name as variables for the environment you want to use:
<script>
var splitAPIKey = "";
var splitName = "";
</script>
You can create the feature flag and apply the baseline configuration using the provided script. The script requires access to the Split Admin API, jq, and the following parameters:
CreateBoxSplit [Project Name] [Environment Name] [Traffic Type] [Split Name] [API_TOKEN]
For example:
CreateBoxSplit Default Production user front_end_choose_boxes <HARNESS_API_TOKEN>
In migrated Harness FME environments, the CreateBoxSplit.sh script supports authentication using either a Harness Personal Access Token (PAT) or a Service Account Token (SAT).
The script attempts both x-api-key and Authorization: Bearer authentication headers. Ensure the token you use has permissions to create and configure feature flags in the target Harness FME project and environment.
To see feature flag changes immediately in Chrome, disable caching on the Network tab in Chrome Developer Tools.
