Using Feature Management & Experimentation with Harness Pipelines
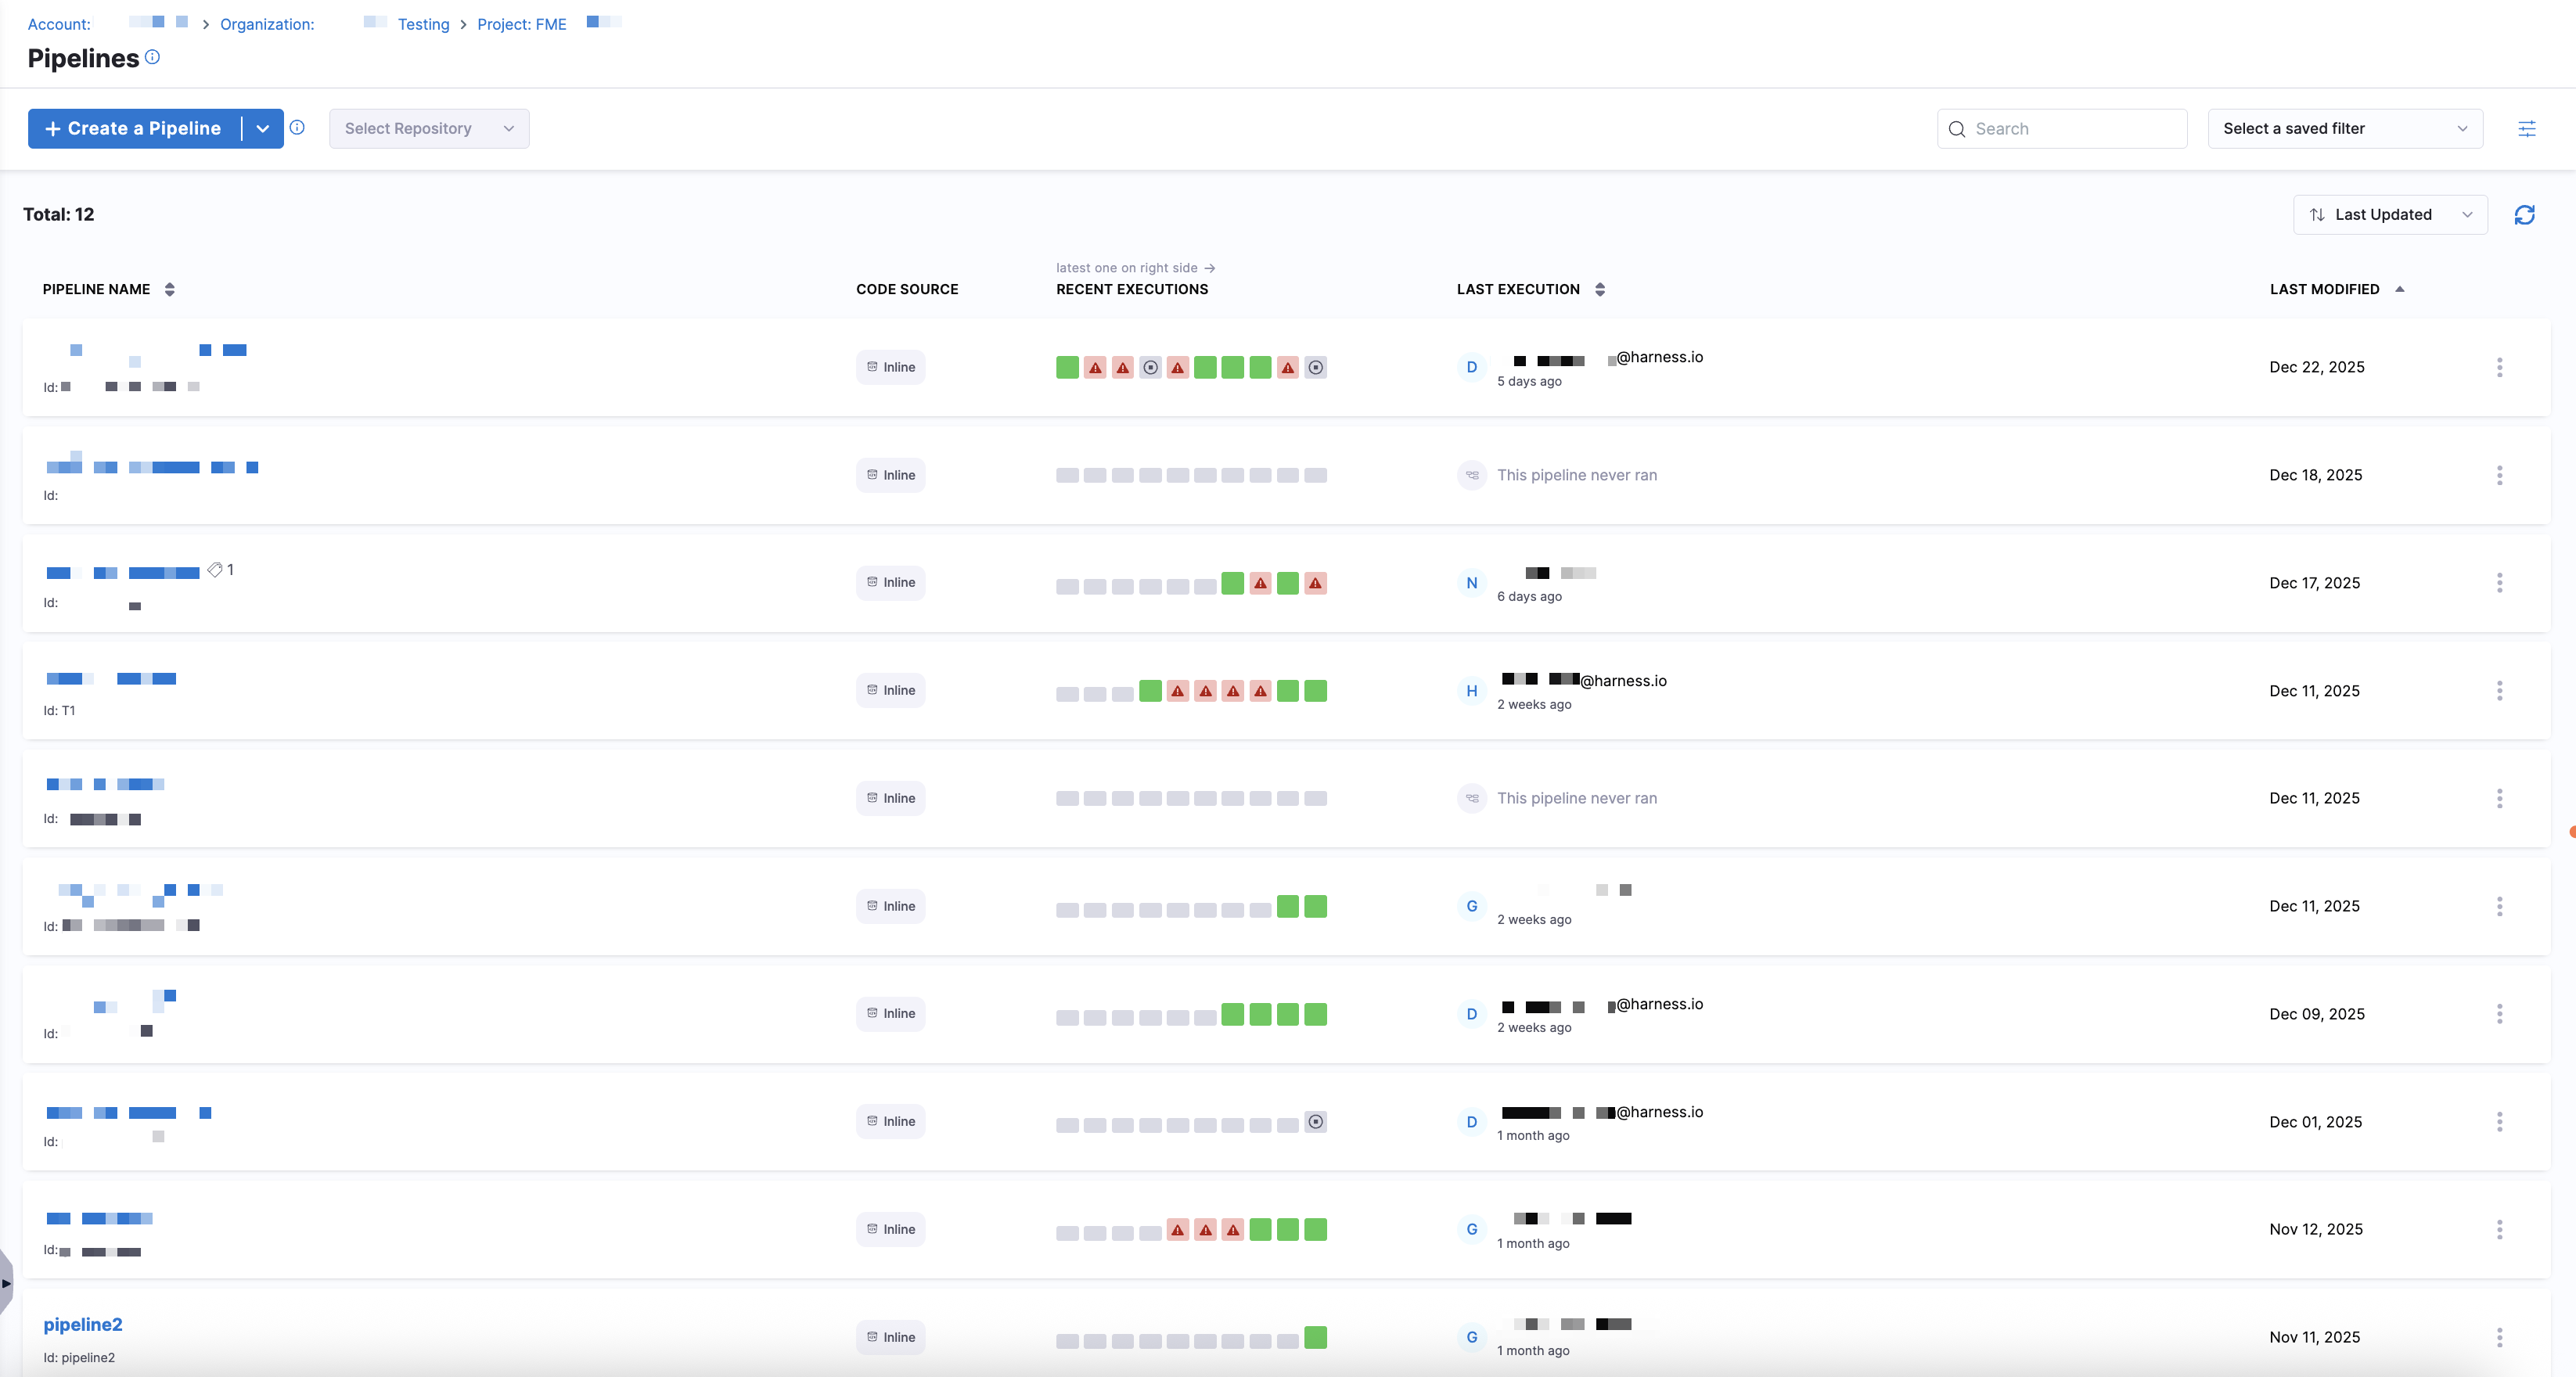
Harness Feature Management & Experimentation (FME) integrates with Harness pipelinesA pipeline is a sequence of stages that define how services are deployed to an environment. Pipelines can include approvals, barriers, notifications, and other execution logic., allowing you to include feature flag logicA feature flag is a conditional toggle in Harness FME that enables or disables specific functionality without deploying new code. It allows for controlled feature rollouts, A/B testing, and quick rollbacks if issues arise. directly within your deployment or automation workflows. The Pipelines page in Harness FME displays a list of Harness pipelines created in your project.
Create a Harness pipeline
To create a pipeline, click + Create a Pipeline. You can create a pipeline manually in the UI or import one from a Git repository. Clicking on a pipeline opens the Pipeline Studio, where you can design and manage the pipeline using either the Visual or YAML editor.
- Visual
- YAML
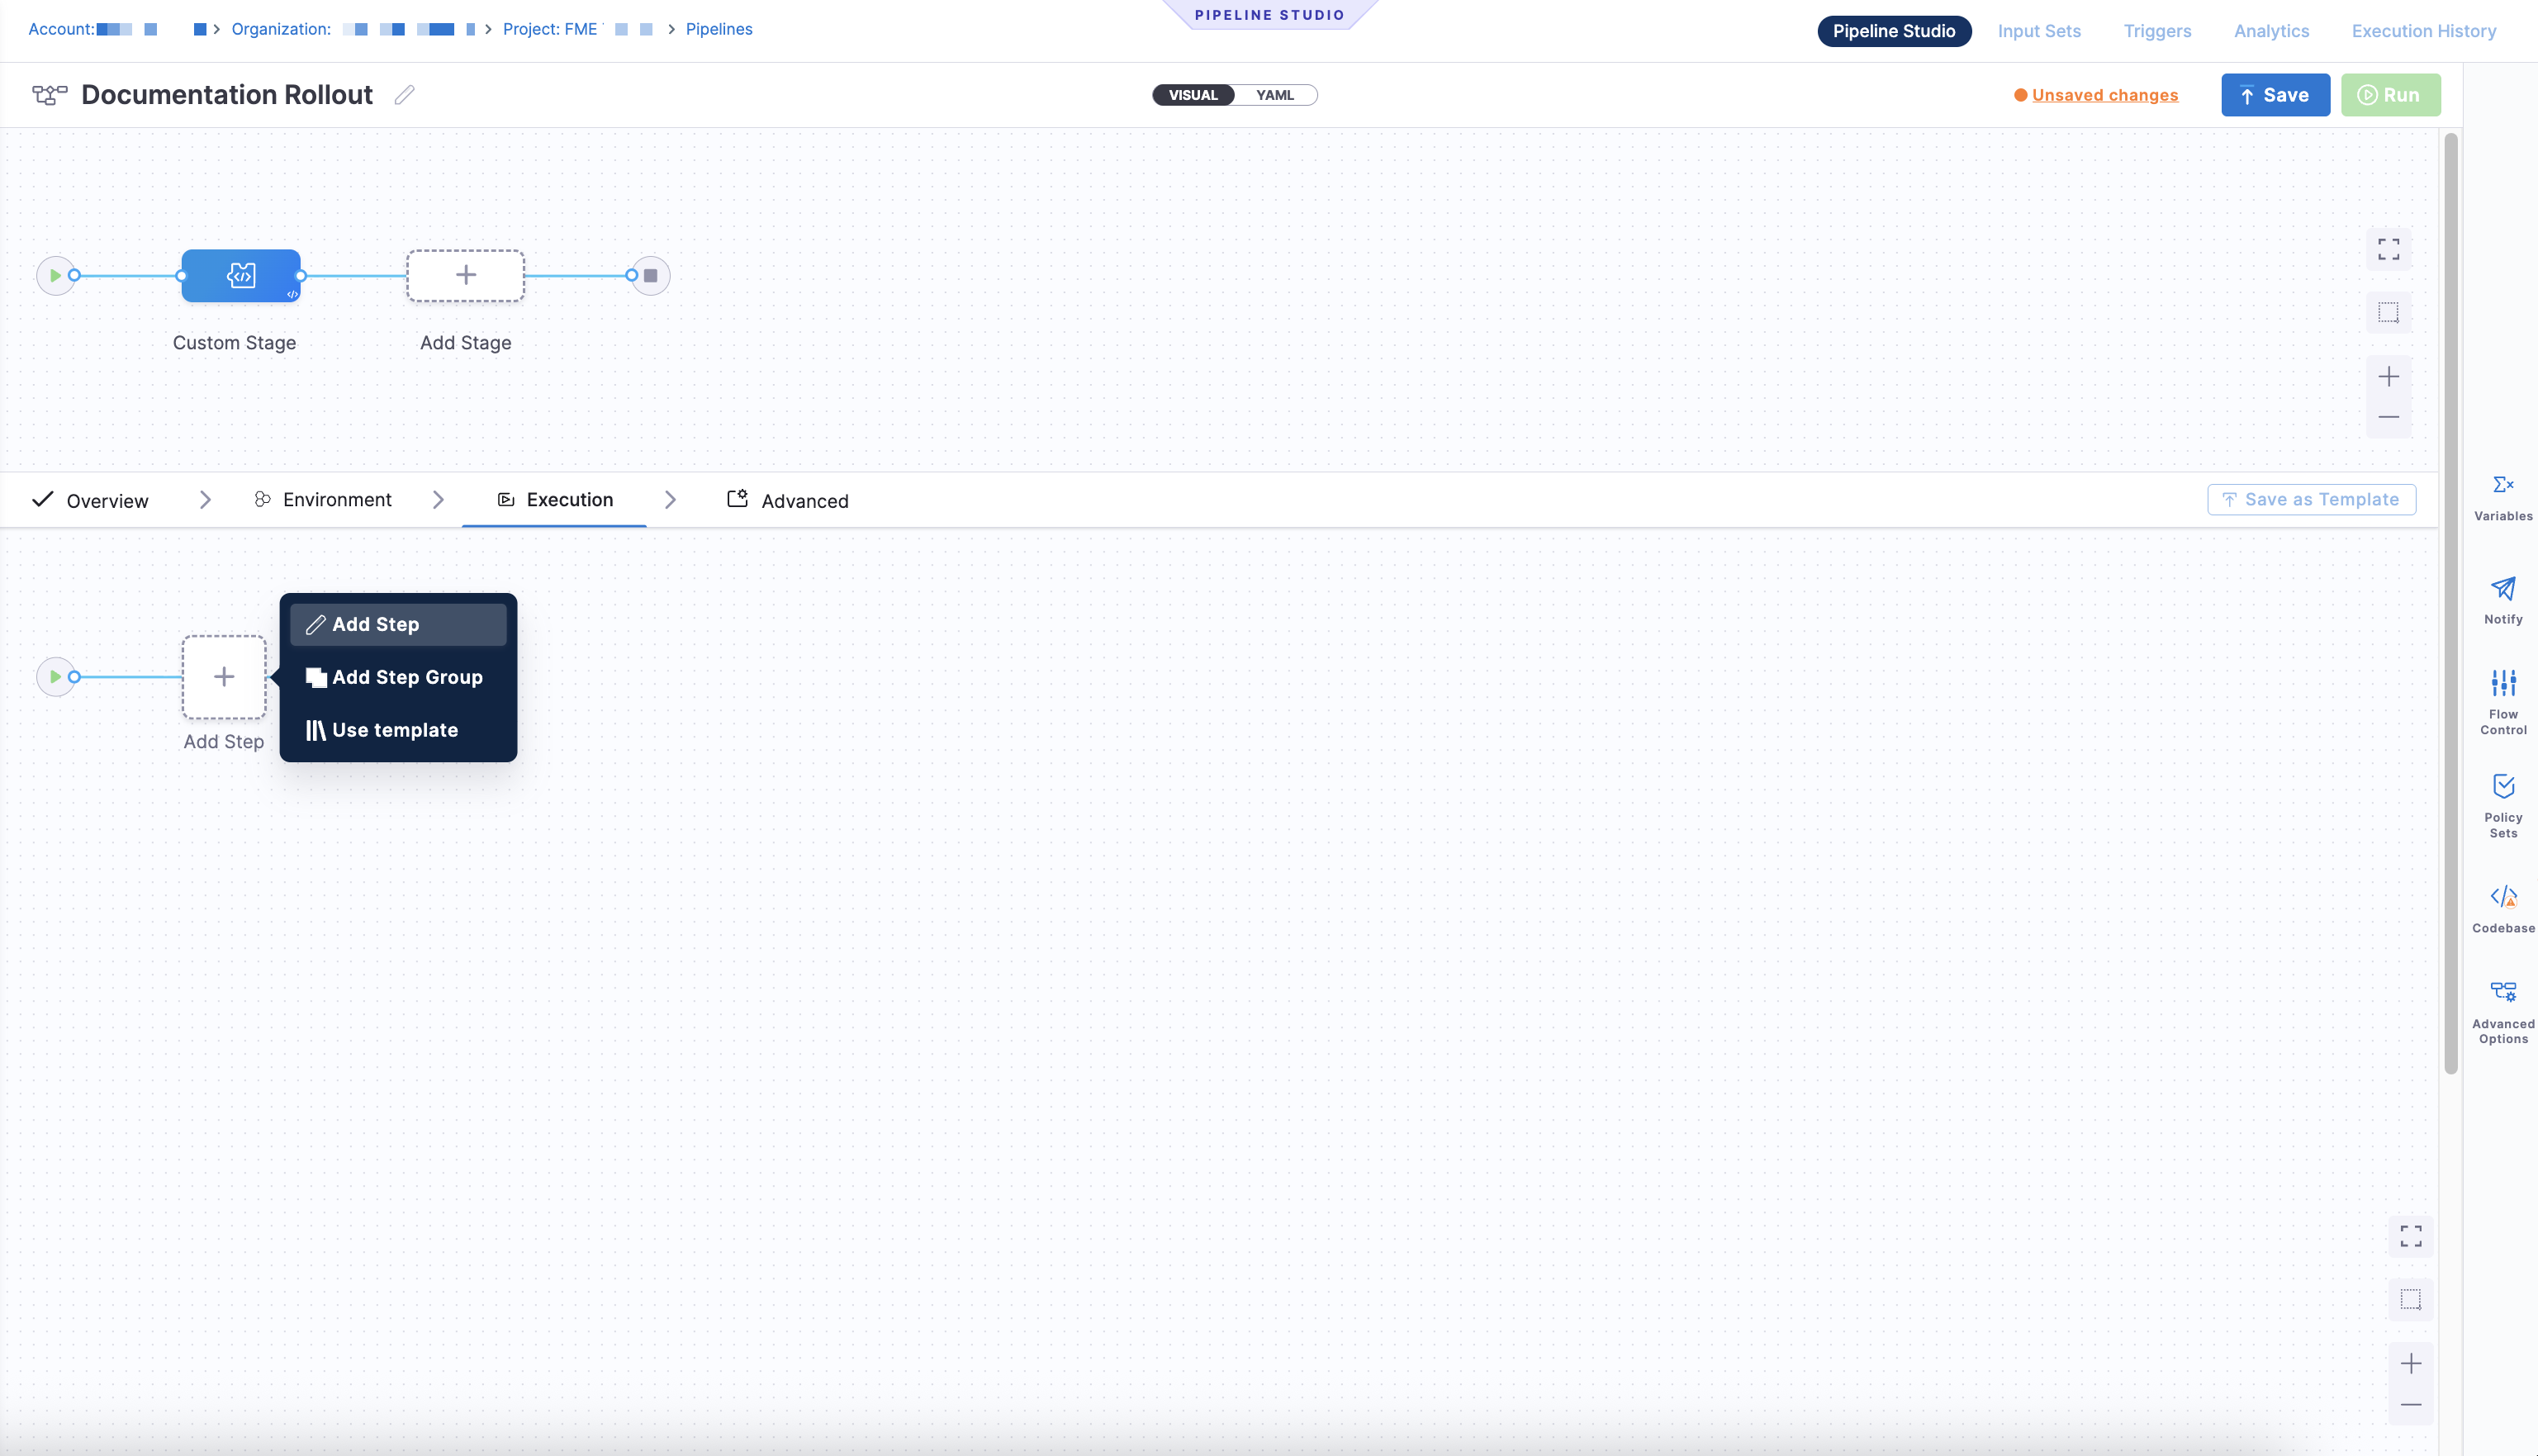
The Visual tab lets you configure stages and steps using the UI, including adding FME steps supported in Custom stagesA custom stage is a user-defined stage in a pipeline that allows you to run custom logic or actions as part of a pipeline. FME steps are only supported in Custom stages.. Add a custom stage and click Add Step to open the Step Library.
The YAML tab displays the full pipeline definition as YAML. Click Edit YAML to modify the pipeline configuration in code.
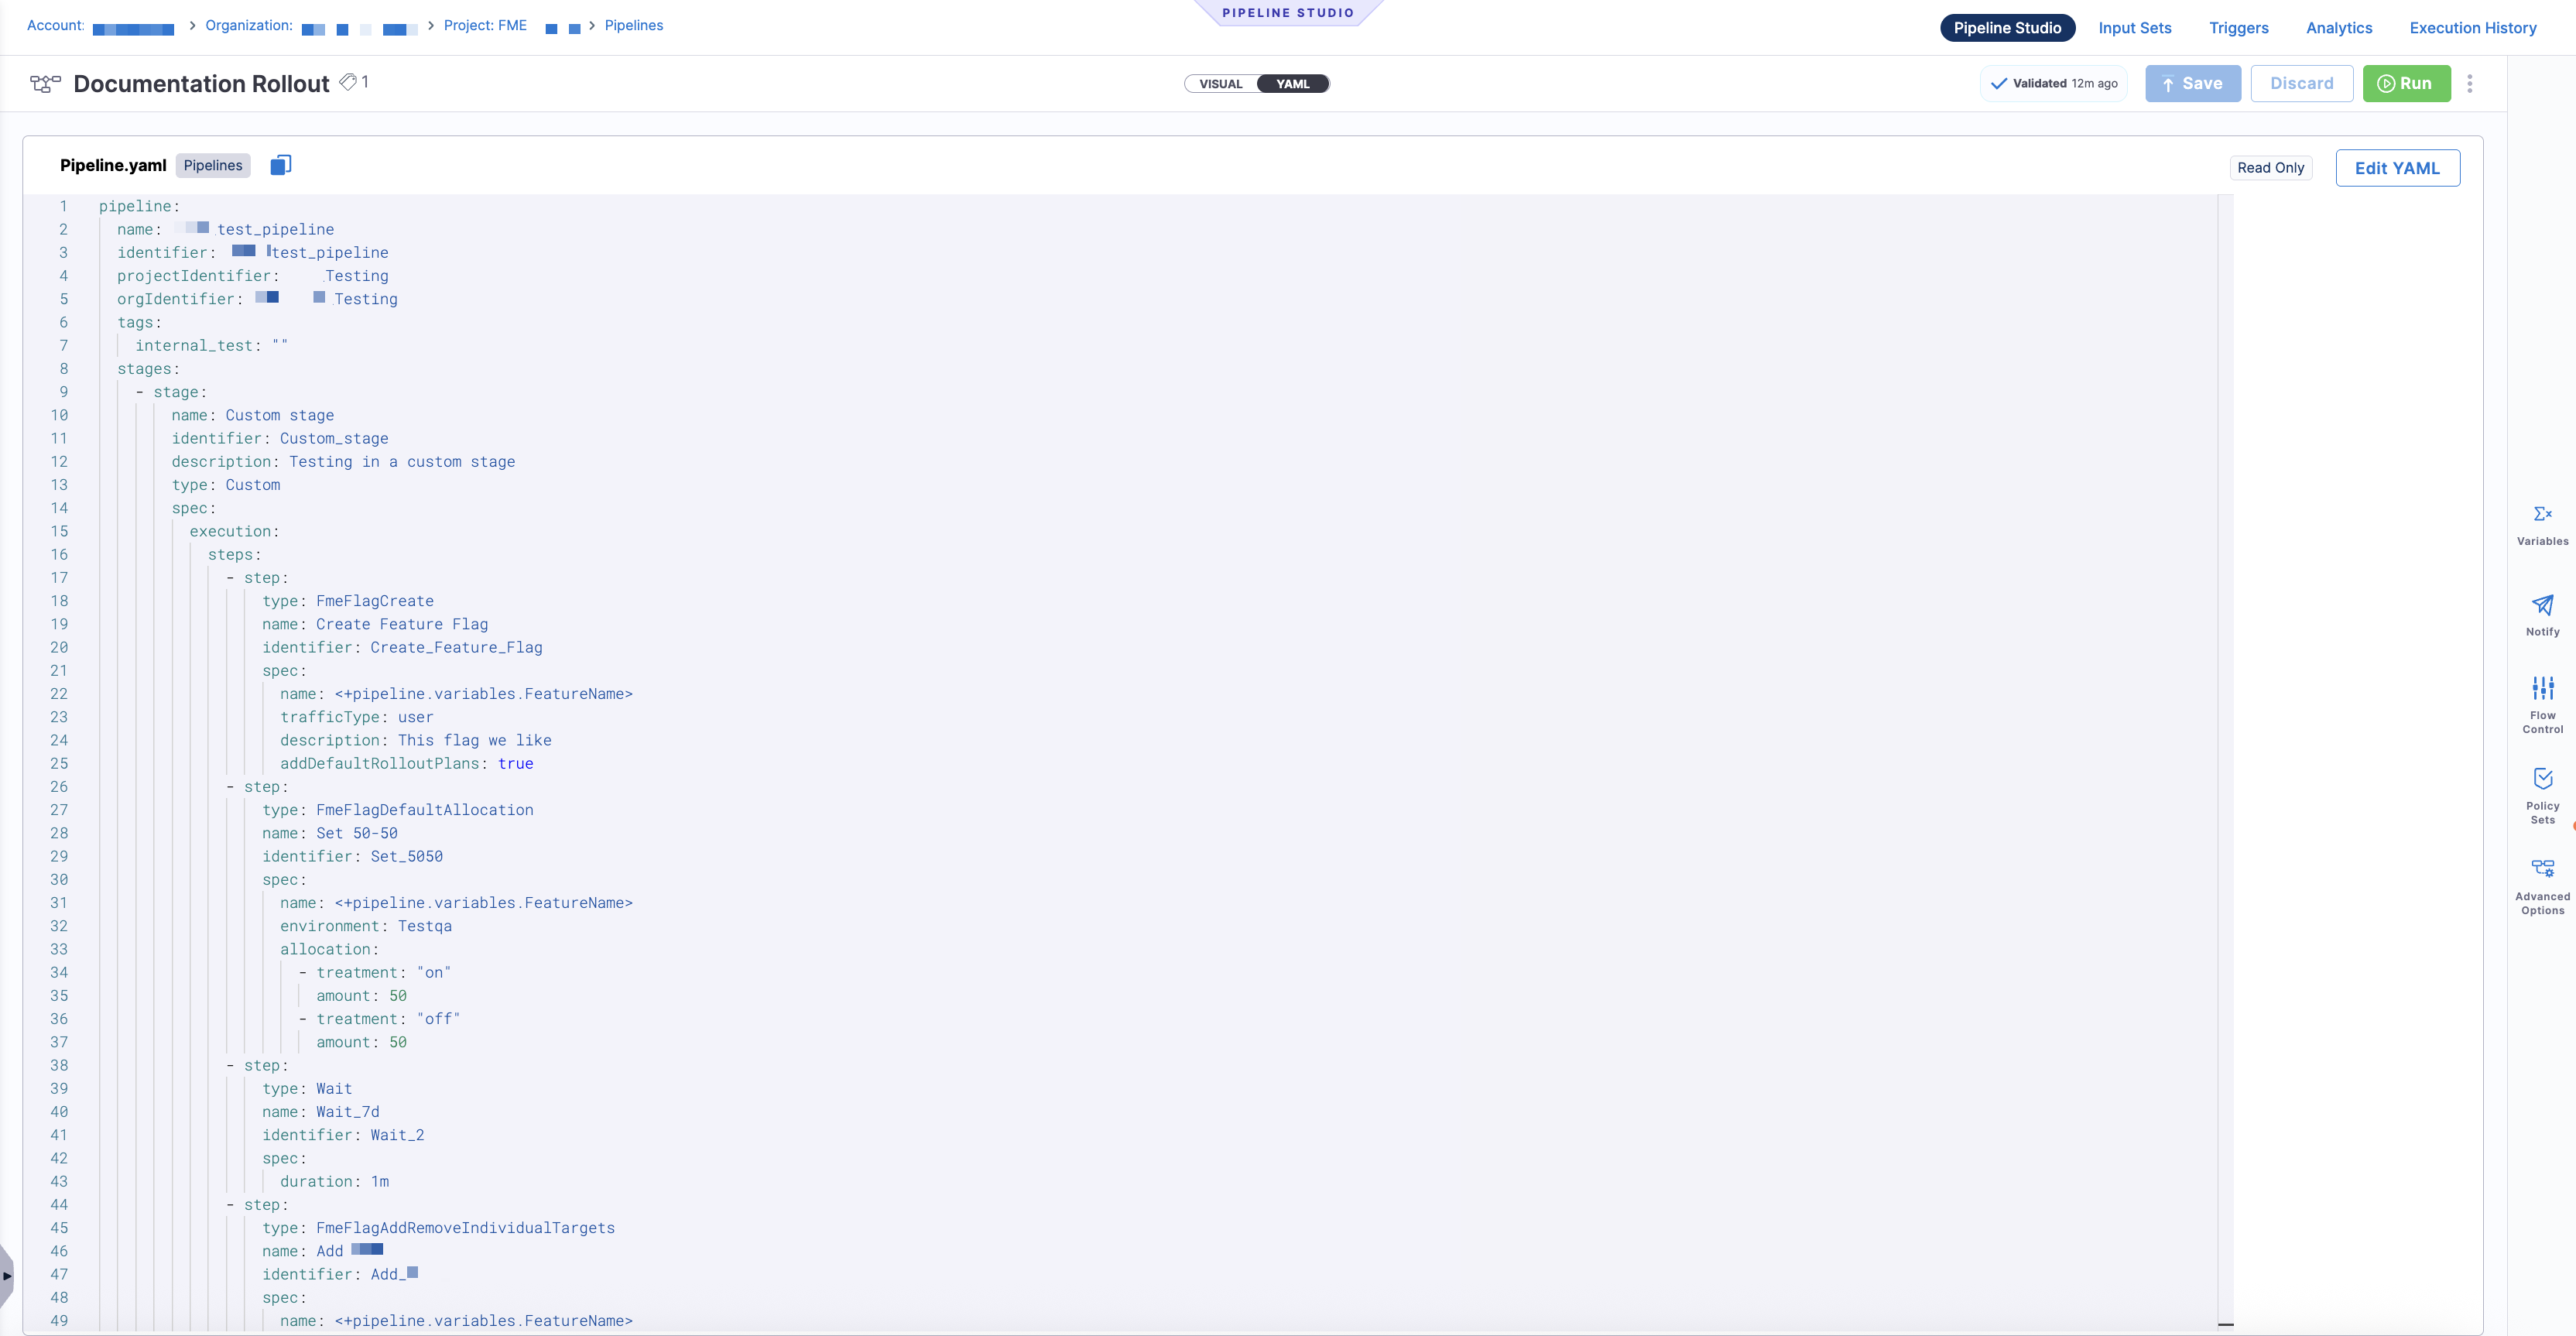
Both views stay in sync; changes made in the Visual editor are reflected in the YAML, and changes made in YAML are reflected back in the Visual editor.
When you configure a pipeline, you set it up like any standard pipeline, with the addition of FME stepsA step is an individual action within a stage. FME steps include operations such as creating or updating a feature flag, modifying rollout behavior, or killing a flag. at the stage levelA stage represents a discrete phase of a pipeline, such as testing, experimentation, or production rollout. You can add FME steps to any Custom stage, whether newly created or existing.. These steps let you integrate feature flag operations directly into your deployment or automation workflow.
Permissions
Pipeline permissions are controlled through Harness RBAC for FME. Pipeline runs that include FME steps require the same permissions you would need to edit feature flags in Harness FME.
- You need view (
core_pipeline_view), create/edit (core_pipeline_edit), and execute (core_pipeline_execute) pipeline permissions. - You also need create/edit (
fme_fmefeatureflag_edit) permissions for feature flags in any FME environment the pipeline modifies. If a pipeline run tries to update a flag in an environment where you don't have edit access, the step will fail.
How FME steps work in Harness pipelines
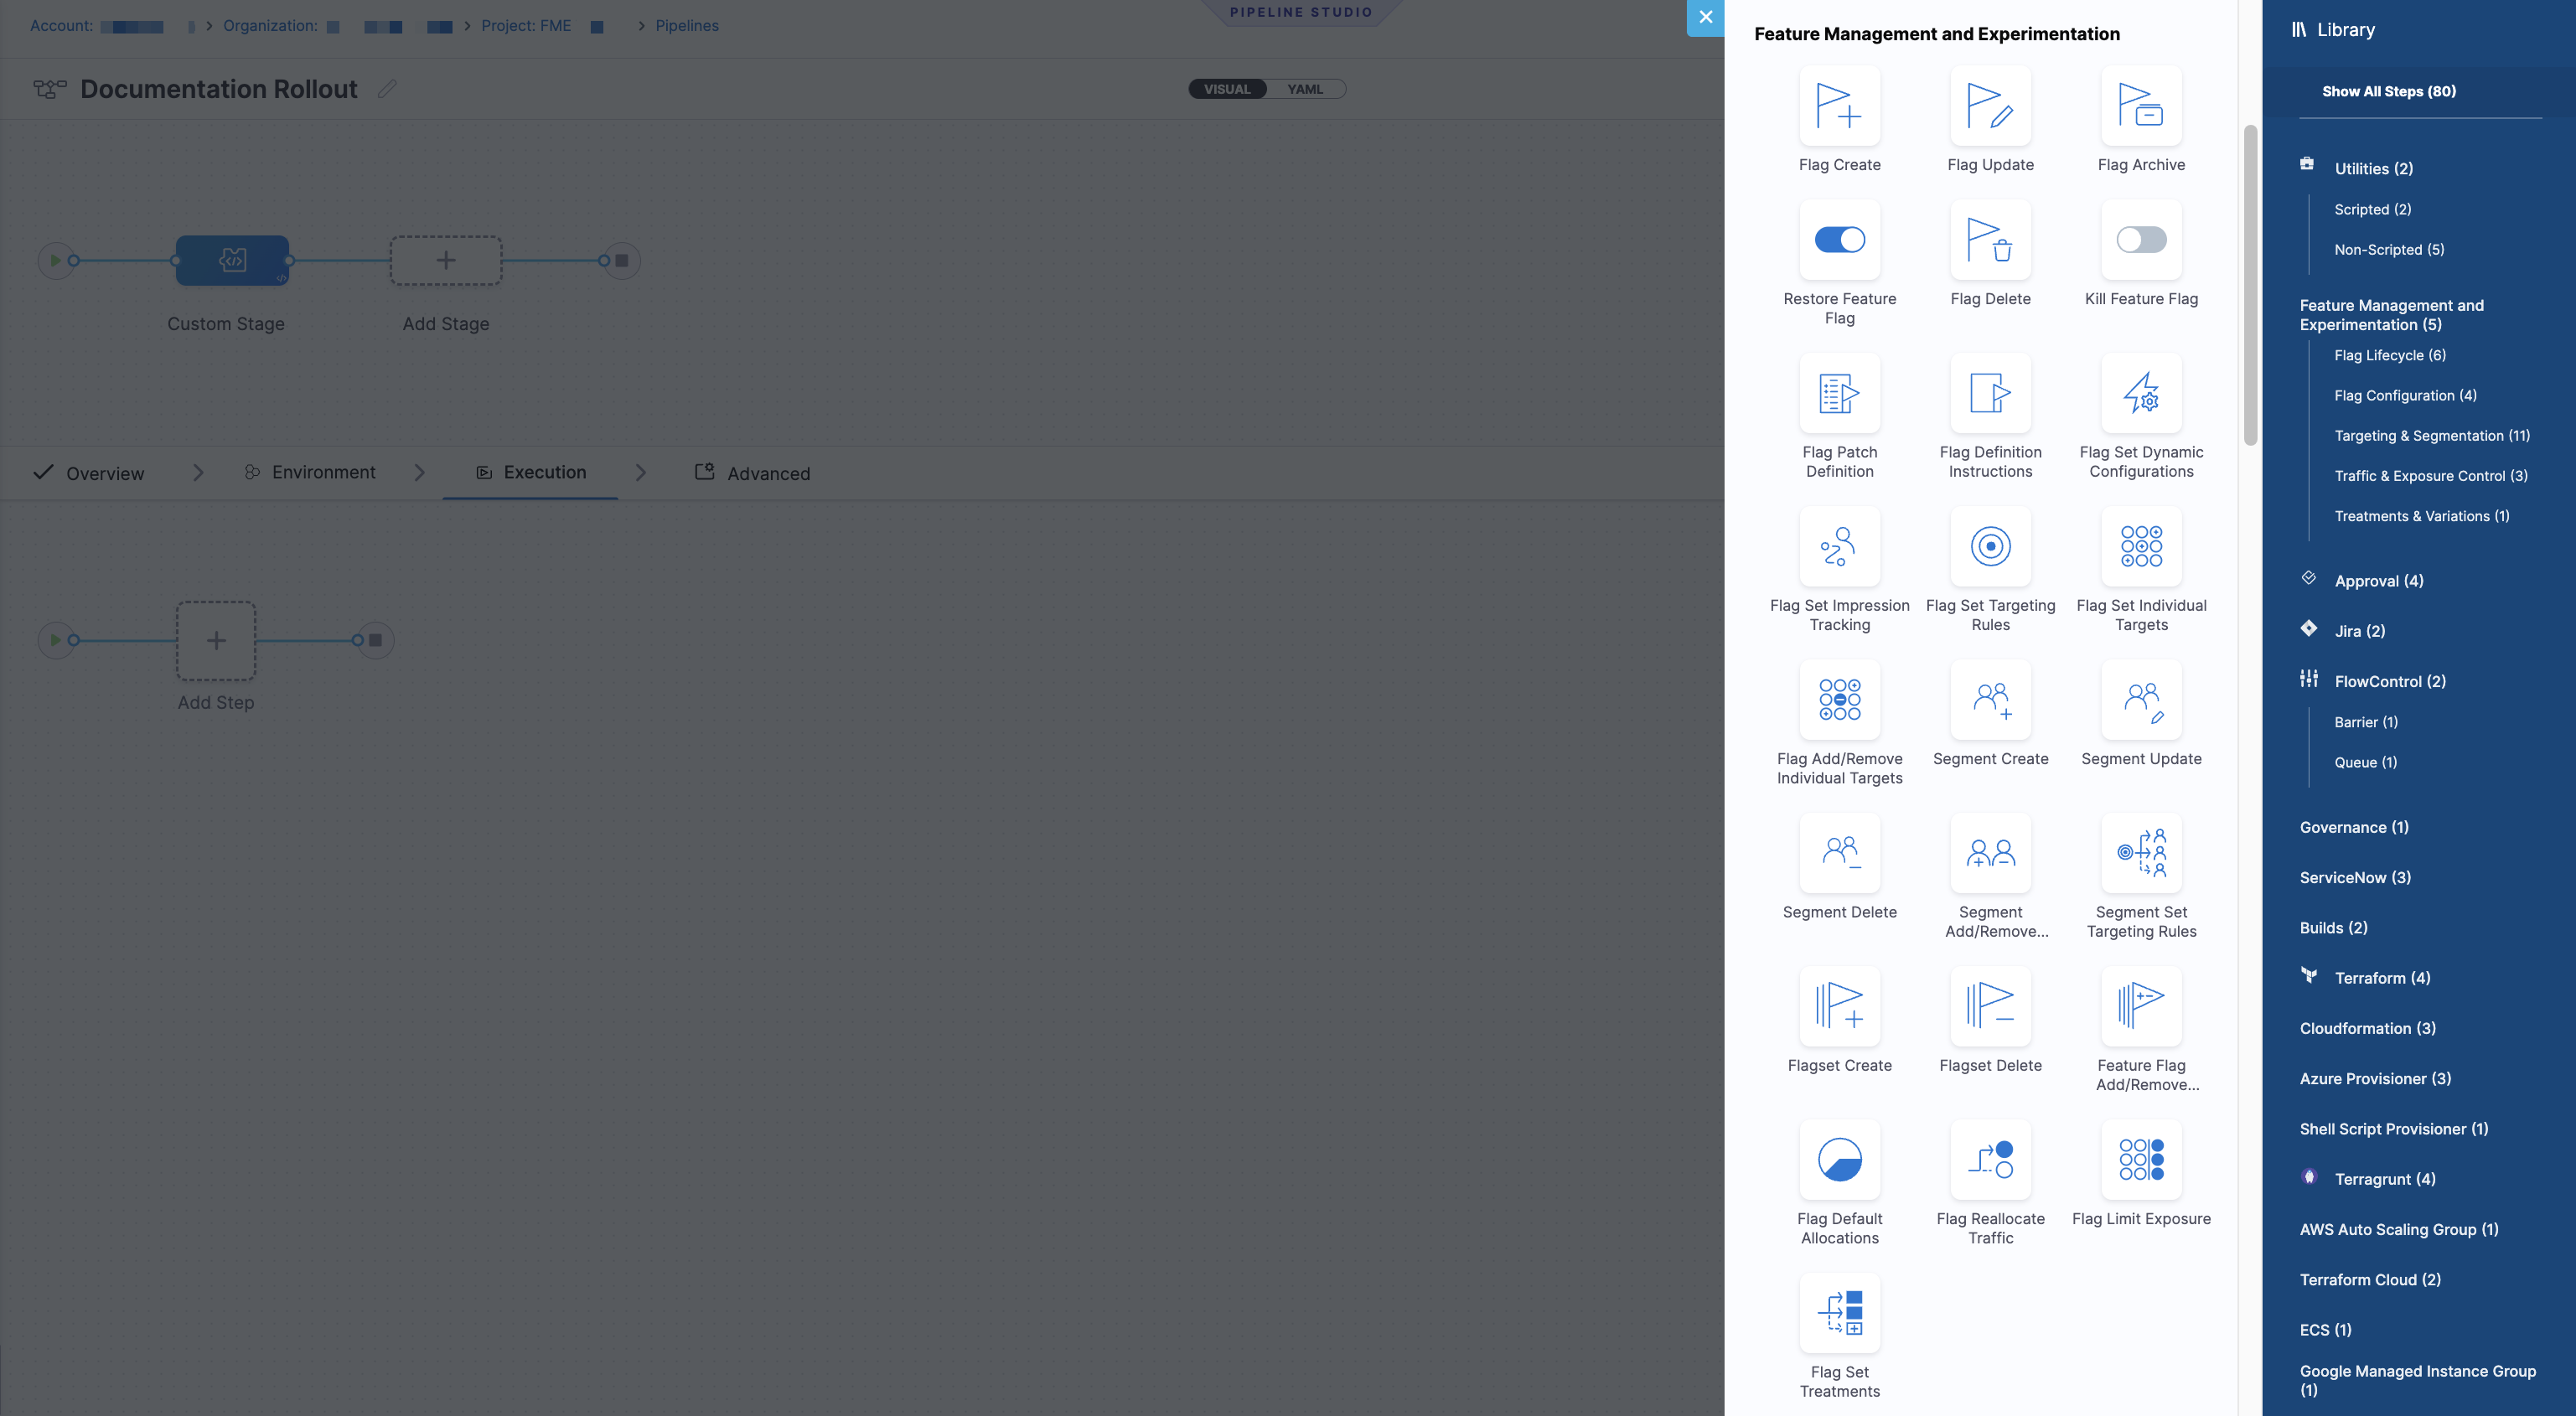
When you add a stepA step is an individual action within a stage. FME steps include operations such as creating or updating a feature flag, modifying rollout behavior, or killing a flag. to a Custom stageA custom stage is a user-defined stage in a pipeline that allows you to run custom logic or actions as part of a pipeline. FME steps are only supported in Custom stages. in the Pipeline Studio, the Step Library includes a Feature Management & Experimentation section with FME-specific steps.
Each FME step runs like any other Harness pipeline step and performs a single, discrete feature flag operation, such as creating a flag, updating metadata, modifying individual targets, or killing a flag. These steps execute in sequence with the rest of your pipeline logic and support standard pipeline capabilities, including approvals, notifications, and custom failure strategies.
How approvals work with FME steps
Approvals can be added in Harness pipelines to prevent the execution from proceeding without approval. An Approval stage or step pauses the pipeline and requires an approver to approve or reject before the pipeline continues. For more information about approval stages or steps, see the Platform documentation.
When using FME steps in pipelines, these Harness approvals control the execution flow. FME environment-level approval settings do not apply to pipeline runs.
This approach lets teams coordinate automated workflows and feature flag changes within a single, auditable pipeline. By adding FME steps to your pipeline stages, you can:
- Create and manage feature flags as part of your deployment or promote workflows using Create Feature Flag and Update Feature Flag, including defining flags across all environments and updating metadata such as status, owners, and tags
- Manage individual targeting lists deterministically with Set Individual Targets and Add/Remove Individual Targets, allowing you to define or modify explicit target membership during a pipeline run
- Control default rollout behavior using Set Default Allocations, configuring how traffic is allocated when no targeting rules apply
- Immediately disable a feature flag with Kill Feature Flag as part of an incident runbook
FME steps in Harness pipelines allow feature flag operations to be predictable, reusable, and executed alongside application deployments and other automated workflows, helping teams coordinate releases while reducing manual configuration and operational risk.
Add FME steps to a pipeline stage
FME steps are compatible with the Custom stage in Harness pipelines.
To add FME steps to a pipeline:
-
Navigate to the Pipelines page from the FME navigation menu.
-
Click + Create a Pipeline or click +Import From Git to import a pipeline from an existing Git repository.
-
Enter a name for the pipeline. Optionally, add a description and include tags for this pipeline.
-
Click Inline to store the pipeline in Harness or Remote to store the pipeline in a Git repository.
-
Click Start.
-
Click Add Stage and select Custom Stage.
-
Click + Add Step. The Step Library panel opens on the right.
-
Navigate to the Feature Management & Experimentation (FME) section and select a step.
FME step Use case When to use it Create Feature Flag Create a new feature flag Use when introducing a new feature flag as part of deployment or feature development. This step instantiates the flag across all environments with default rollout plans. Update Feature Flag Update flag metadata Use when you need to edit flag properties such as the description, rollout status, owners, or tags without changing targeting or traffic allocation. Delete Feature Flag Permanently delete a feature flag Use when a feature flag is no longer needed and should be removed entirely. Optionally deletes all flag definitions across environments before deletion. Archive Feature Flag Archive a feature flag Use when a feature flag is no longer active but should be preserved for historical reference rather than permanently deleted. Set Default Allocations Control default rollout percentages Use when you want to define how traffic is split across treatments for users who do not match any targeting rules (for example, 50/50, 75/25, or 100% on). Set Individual Targets Define the full set of individual targets Use when you want to deterministically set the complete list of individual targets for a flag in an environment, replacing any existing list. Add/Remove Individual Targets Incrementally modify targeting Use when you need to add or remove specific users or segments without overwriting existing individual target lists. Useful for gradual rollouts or hand-picked targets. Kill Feature Flag Immediately disable a feature Use to kill the flag in the specified environment, serving the default treatment. Restore Feature Flag Restore a killed feature flag Use to restore a feature flag that was previously killed in a specific environment, returning it to its prior serving state. Set Treatments Define treatments for a feature flag Use when you want to define or replace the set of treatments for a feature flag in a specific environment, including setting the default treatment. Set Dynamic Configurations Set dynamic configurations for treatments Use when you want to attach or update dynamic configuration values for each treatment of a feature flag in a specific environment. Set Targeting Rules Define targeting rules for a feature flag Use when you want to define or replace the targeting rules that determine which treatment is served based on conditions such as segment membership, attributes, or other flag states. Limit Exposure Control exposure to targeting rules Use when you want to set the percentage of users exposed to targeting rules in a specific environment, with everyone else going to the default treatment. Reallocate Traffic Reassign users across treatments Use to reassign users across treatments for a feature flag in a specific environment without changing the targeting rules. This regenerates the seed value used for randomizing assignment in percentage distributions. Patch Definition Apply patch operations to a flag definition Use when you want to apply granular patch operations to a feature flag definition in a specific environment. Definition Instructions Apply flag definition instructions atomically Use when you want to apply structured, UI-driven changes to a feature flag definition in a single, atomic operation in a specific environment. Create Segment Create standard or rule-based segments Use when you want to create reusable audience segments for targeting feature flags based on user attributes, traffic type, or targeting rules. Update Segment Update segment metadata Use when you need to modify segment metadata such as descriptions or owners without changing the segment targeting logic. Delete Segment Permanently delete a segment Use when a segment is no longer needed and should be removed from Harness FME. Add/Remove Segment Targets Incrementally modify segment targets Use when you need to add or remove specific target keys from a segment without replacing the entire target list. Set Rule-Based Segment Targeting Define targeting rules for rule-based segments Use when you want to define or replace the targeting rules used to dynamically populate a rule-based segment. Create Flag set Create a flag set Use when you want to organize related feature flags into a shared grouping for management and governance workflows. Delete Flag set Permanently delete a flag set Use when a flag set is no longer needed and should be removed from Harness FME. Add/Remove Flags from Flag sets Manage flag set membership Use when you want to add or remove feature flags from existing flag sets without recreating the flag set. Set Impression Tracking Enable or disable impression tracking Use when you want to control whether impression events are collected for a feature flag for observability or experimentation analysis. -
Configure the step in the Step Parameters tab.
-
Optionally, add additional configuration in the Advanced tab.
-
Click Save to add the step to the stage.
Example Pipeline YAML Configuration
The following example shows a Harness pipeline that uses multiple FME stepsA step is an individual action within a stage. FME steps include operations such as creating or updating a feature flag, modifying rollout behavior, or killing a flag. within a Custom stageA step is an individual action within a stage. FME steps include operations such as creating or updating a feature flag, modifying rollout behavior, or killing a flag. to coordinate feature flag creation, rollout, targeting, and kill actions alongside standard pipeline steps:
pipeline:
  name: <PIPELINE_NAME>
  identifier: <PIPELINE_ID>
  projectIdentifier: Default
  orgIdentifier: <ORG_ID>
  tags: {}
  variables:
    - name: flagName
      type: String
      description: "The feature flag name for this feature rollout."
      required: true
      value: <+input>
  stages:
    - stage:
        name: demo_stage
        identifier: demo_stage
        description: "Custom stage with FME steps for this feature rollout."
        type: Custom
        spec:
          execution:
            steps:
              - step:
                  type: FmeFlagCreate
                  name: initial setup
                  identifier: initial_setup
                  spec:
                    name: <+pipeline.variables.flagName>
                    trafficType: user
                    description: live demo flag
              - step:
                  type: FmeFlagSetIndividualTargets
                  name: add testers to on
                  identifier: add_testers_to_on
                  spec:
                    flagName: <+pipeline.variables.flagName>
                    environment: Prod-Default
                    treatments:
                      - treatment: "on"
                        keys:
                          - user1
                          - user2
                        segments: []
              - step:
                  type: FmeFlagAddRemoveIndividualTargets
                  name: add beta user
                  identifier: add_beta_user
                  spec:
                    flagName: <+pipeline.variables.flagName>
                    environment: Prod-Default
                    treatments:
                      - treatment: "on"
                        addKeys:
                          - beta_user1
                        removeKeys: []
                        addSegments: []
                        removeSegments: []
              - step:
                  type: Wait
                  name: Wait_1
                  identifier: Wait_1
                  spec:
                    duration: 10s
              - step:
                  type: FmeFlagDefaultAllocation
                  name: 50-50 Rollout
                  identifier: _rollout
                  spec:
                    flagName: <+pipeline.variables.flagName>
                    environment: Prod-Default
                    allocation:
                      - treatment: "on"
                        amount: 50
                      - treatment: "off"
                        amount: 50
              - step:
                  type: FmeFlagUpdate
                  name: Change status to ramping
                  identifier: FmeFlagUpdate_1
                  spec:
                    name: <+pipeline.variables.flagName>
                    tags:
                      - demo
                    rolloutStatus: Ramping
              - step:
                  type: HarnessApproval
                  name: Harness Manual Approval
                  identifier: Harness_Manual_Approval
                  spec:
                    approvalMessage: Please review the change and approve.
                    includePipelineExecutionHistory: true
                    isAutoRejectEnabled: false
                    approvers:
                      userGroups:
                        - account._fme_admins
                      minimumCount: 1
                      disallowPipelineExecutor: false
                    approverInputs: []
                  timeout: 1d
              - step:
                  type: FmeFlagDefaultAllocation
                  name: Rollout out to everyone
                  identifier: FmeFlagDefaultAllocation_2
                  spec:
                    flagName: <+pipeline.variables.flagName>
                    environment: Prod-Default
                    allocation:
                      - treatment: "on"
                        amount: 100
                      - treatment: "off"
                        amount: 0
              - step:
                  type: FmeFlagKill
                  name: Kill flag on incident
                  identifier: kill_flag_on_incident
                  spec:
                    flagName: <+pipeline.variables.flagName>
                    environment: Prod-Default
        tags: {}
Configure FME steps
Each FME step is configured at the stage levelA stage represents a discrete phase of a pipeline, such as testing, experimentation, or production rollout. You can add FME steps to any Custom stage, whether newly created or existing. of a pipeline. After adding an FME step from the Step Library, you can configure its behavior using the Step Parameters tab, and optionally refine execution behavior using the Advanced tab.
The following section walks through how to configure each FME step.
Create Feature Flag
Use this step to create a feature flag and define it across all environments with default rollout plans.
-
In your pipeline stage, click + Add Step.
-
Select Create Feature Flag under Feature Management & Experimentation in the Step Library.
-
In the Step Parameters tab, configure the following:
- Name: Add a step name (such as
Create Feature Flag). - Feature Flag Name: Add a name for the feature flag or use a pipeline variable (for example,
<+pipeline.variables.FeatureName>). - Traffic Type: Select the traffic type (for example,
user). - Description: Optionally, enter a description for the feature flag.
- Owners: Optionally, select one or more owners for the feature flag.
- Tags: Optionally, add tags to help organize and filter feature flags.
- Name: Add a step name (such as
-
Click Apply Changes to add the step to the pipeline.
Update Feature Flag
Use this step to update feature flag metadata without changing rollout behavior or targeting.
-
In your pipeline stage, click + Add Step.
-
Select Update Feature Flag under Feature Management & Experimentation in the Step Library.
-
In the Step Parameters tab, configure the following:
- Name: Add a step name (such as
Update Feature Flag). - Feature Flag Name: Add a name of the existing feature flag.
- Description: Optionally, update the feature flag description.
- Owners: Optionally, update feature flag ownership.
- Rollout Status: Optionally, update the feature flag rollout status.
- Tags: Optionally, add or modify tags.
- Name: Add a step name (such as
-
Click Apply Changes to add the step to the pipeline.
Delete Feature Flag
Use this step to permanently delete a feature flag.
-
In your pipeline stage, click + Add Step.
-
Select Delete Feature Flag under Feature Management & Experimentation in the Step Library.
-
In the Step Parameters tab, configure the following:
- Name: Add a step name (such as
Delete Feature Flag). - Feature Flag Name: Add the name of the feature flag to delete.
- Delete All Definitions: Optionally, enable this option to delete all feature flag definitions across environments before deleting the flag.
- Name: Add a step name (such as
-
Click Apply Changes to add the step to the pipeline.
Archive Feature Flag
Use this step to archive a feature flag, preserving it for historical reference without permanently deleting it.
-
In your pipeline stage, click + Add Step.
-
Select Archive Feature Flag under Feature Management & Experimentation in the Step Library.
-
In the Step Parameters tab, configure the following:
- Name: Add a step name (such as
Archive Feature Flag). - Feature Flag Name: Add the name of the feature flag to archive.
- Name: Add a step name (such as
-
Click Apply Changes to add the step to the pipeline.
Set Default Allocations
Use this step to control how traffic is allocated across treatments for users who do not match any targeting rules.
-
In your pipeline stage, click + Add Step.
-
Select Set Default Allocations under Feature Management & Experimentation in the Step Library.
-
In the Step Parameters tab, configure the following:
- Name: Add a step name.
- Environment: Specify the environment.
- Feature Flag: Add the feature flag name.
-
Under the Flag Change section, define one or more allocations by clicking + Add Allocation:
- Treatment: Select a treatment to apply.
- Allocation Percentage: Enter the percentage of traffic for this treatment (0–100).
-
Ensure the total allocation across all treatments equals 100%.
-
Click Apply Changes to add the step to the pipeline.
Set Individual Targets
Use this step to define the complete set of individual targets for a feature flag in a specific environment. This replaces any existing individual targeting configuration.
-
In your pipeline stage, click + Add Step.
-
Select Set Individual Targets under Feature Management & Experimentation in the Step Library.
-
In the Step Parameters tab, configure the following:
- Name: Add a step name.
- Environment: Specify the environment where targeting should be applied.
- Feature Flag: Add the feature flag name.
-
Under the Set Individual Targets section, configure one or more treatments where you want to override the current individual targets list by clicking + Add Treatment:
- For Treatment: Select a treatment to apply.
- Keys: Optionally, enter the individual target keys to include.
- Segments: Optionally, enter individual segments to include.
-
Click Apply Changes to add the step to the pipeline.
Add/Remove Individual Targets
Use this step to incrementally add or remove individual targets without replacing the existing target list.
-
In your pipeline stage, click + Add Step.
-
Select Add/Remove Individual Targets under Feature Management & Experimentation in the Step Library.
-
In the Step Parameters tab, configure the following:
- Name: Add a step name.
- Environment: Specify the target environment.
- Feature Flag: Add the feature flag name.
-
Under the Flag Change section, configure one or more treatments by clicking + Add Treatment:
- For Treatment: Select a treatment to apply.
- Add Segments: Optionally, enter segments to include.
- Add Keys: Optionally, enter individual target keys to include.
- Remove Segments: Optionally, enter segments to remove.
- Remove Keys: Optionally, enter individual keys to remove.
-
Click Apply Changes to add the step to the pipeline.
Kill Feature Flag
Use this step to immediately disable a feature flag in a specific environment.
-
In your pipeline stage, click + Add Step.
-
Select Kill Feature Flag under Feature Management & Experimentation in the Step Library.
-
In the Step Parameters tab, configure the following:
- Name: Add a step name.
- Environment: Specify the environment.
- Feature Flag: Add the feature flag name.
-
Click Apply Changes to add the step to the pipeline.
Restore Feature Flag
Use this step to restore a feature flag that was previously killed in a specific environment.
-
In your pipeline stage, click + Add Step.
-
Select Restore Feature Flag under Feature Management & Experimentation in the Step Library.
-
In the Step Parameters tab, configure the following:
- Name: Add a step name.
- Environment: Specify the environment.
- Feature Flag: Add the feature flag name.
-
Click Apply Changes to add the step to the pipeline.
Set Treatments
Use this step to define or replace the set of treatments for a feature flag in a specific environment.
-
In your pipeline stage, click + Add Step.
-
Select Set Treatments under Feature Management & Experimentation in the Step Library.
-
In the Step Parameters tab, configure the following:
- Name: Add a step name.
- Environment: Specify the environment.
- Feature Flag: Add the feature flag name.
- Default Treatment: Select the treatment to serve by default.
-
Under the Treatments section, define two or more treatments by clicking + Add Treatment:
- Treatment: Enter the treatment name.
- Description: Enter a description for the treatment.
You can add new treatments or remove existing ones by passing an updated list. However, a treatment that has traffic allocated to it (through default allocations or targeting rules) cannot be omitted. The step will fail if a treatment with assigned traffic is missing from the list.
-
Click Apply Changes to add the step to the pipeline.
Set Dynamic Configurations
Use this step to attach or update dynamic configuration values for each treatment of a feature flag in a specific environment.
-
In your pipeline stage, click + Add Step.
-
Select Set Dynamic Configurations under Feature Management & Experimentation in the Step Library.
-
In the Step Parameters tab, configure the following:
- Name: Add a step name.
- Environment: Specify the environment.
- Feature Flag: Add the feature flag name.
-
Under the Treatments section, configure one or more treatments by clicking + Add Treatment:
- Treatment: Select a treatment.
- Configuration: Enter the dynamic configuration value for the treatment.
-
Optionally, define input variables that can be referenced within this step and others in the pipeline.
-
Click Apply Changes to add the step to the pipeline.
Set Targeting Rules
Use this step to define or replace the targeting rules for a feature flag in a specific environment. Targeting rules determine which treatment is served based on conditions such as segment membership, user attributes, or other feature flag states.
-
In your pipeline stage, click + Add Step.
-
Select Set Targeting Rules under Feature Management & Experimentation in the Step Library.
-
In the Step Parameters tab, configure the following:
- Name: Add a step name.
- Environment: Specify the environment.
- Feature Flag: Add the feature flag name.
-
Under the Targeting Rules section, define one or more rules by clicking + Add Rule. Each rule consists of a condition and an allocation:
- Condition: Define one or more condition rules. Each rule specifies a matcher type (such as
IN_SEGMENT,BOOLEAN,EQUAL_NUMBER,CONTAINS_STRING, orBETWEEN_DATE), an optional attribute, a value, and an optional negate flag. - Allocation: For each condition, define how traffic is split across treatments. Each allocation entry specifies a treatment and a size (0–100).
- Condition: Define one or more condition rules. Each rule specifies a matcher type (such as
-
Click Apply Changes to add the step to the pipeline.
Limit Exposure
Use this step to set the percentage of users exposed to targeting rules in a specific environment, with everyone else going to the default treatment.
-
In your pipeline stage, click + Add Step.
-
Select Limit Exposure under Feature Management & Experimentation in the Step Library.
-
In the Step Parameters tab, configure the following:
- Name: Add a step name.
- Environment: Specify the environment.
- Feature Flag: Add the feature flag name.
- Exposure Limit: Enter the maximum percentage of traffic to expose (0–100).
-
Click Apply Changes to add the step to the pipeline.
Reallocate Traffic
Use this step to reassign users across treatments for a feature flag in a specific environment without changing the targeting rules. This regenerates the seed value used for randomizing assignment in percentage distributions, so users may receive different treatments than before.
-
In your pipeline stage, click + Add Step.
-
Select Reallocate Traffic under Feature Management & Experimentation in the Step Library.
-
In the Step Parameters tab, configure the following:
- Name: Add a step name.
- Environment: Specify the environment.
- Feature Flag: Add the feature flag name.
-
Click Apply Changes to add the step to the pipeline.
Patch Definition
Use this step to apply patch operations to a feature flag definition in a specific environment. This step supports bundling multiple changes into a single operation and can be used for advanced configurations. For available operations, refer to the FME Admin API partial update endpoint.
-
In your pipeline stage, click + Add Step.
-
Select Patch Definition under Feature Management & Experimentation in the Step Library.
-
In the Step Parameters tab, configure the following:
- Name: Add a step name.
- Environment: Specify the environment.
- Feature Flag: Add the feature flag name.
- Operations: Enter the patch operations to apply to the flag definition.
-
Optionally, define input variables that can be referenced within this step and others in the pipeline.
-
Click Apply Changes to add the step to the pipeline.
Definition Instructions
Use this step to apply structured change instructions to a feature flag definition in a specific environment. All changes are applied atomically, ensuring consistency across multiple updates in a single execution. This step is ideal when you want a UI-driven way to update flag configurations without writing raw patch operations.
-
In your pipeline stage, click + Add Step.
-
Select Definition Instructions under Feature Management & Experimentation in the Step Library.
-
In the Step Parameters tab, configure the following:
- Name: Add a step name.
- Environment: Specify the environment.
- Feature Flag: Add the feature flag name.
-
In the Flag Definition Changes section, click Add a Flag Change and select an operation from the following options:
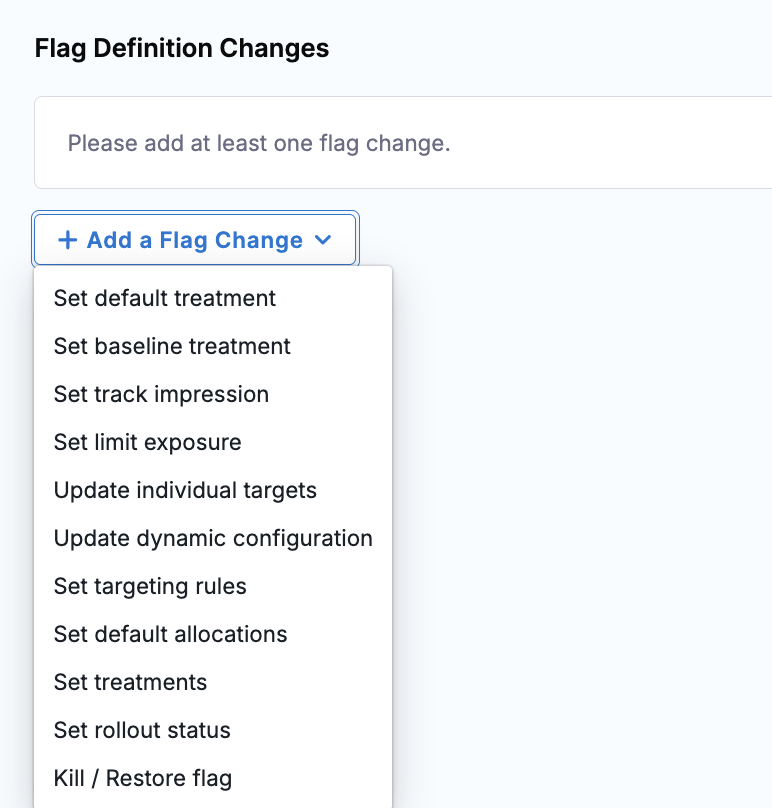
Set Default Treatment
In the
Default Treatmentsection, enter a treatment name.Set Baseline Treatment
In the
Baseline Treatmentsection, enter a treatment name.Set Track Impression
In the
Enable Impression Trackingsection, select Enabled or Disabled.Set Limit Exposure
In the
Exposure Limitsection, enter a number from 0 to 100.Update Individual Targets
In the
Treatment Configurationssection, enter a treatment name in theTreatmentfield.- Optionally, enter keys to add in the
Add Keysfield. - Optionally, enter keys to remove in the
Remove Keysfield. - Optionally, enter keys to set in the
Set Keysfield. - Optionally, enter segments to add in the
Add Segmentsfield. - Optionally, enter segments to remove in the
Remove Segmentsfield. - Optionally, enter segments to set in the
Set Segmentsfield.
You cannot use Set Keys together with Add Keys or Remove Keys in the same change. Similarly, you cannot use Set Segments together with Add Segments or Remove Segments.
- Use Set when you want to fully replace existing values.
- Use Add/Remove when you want to incrementally update existing values.
Click + Add Treatment to configure additional treatments.
Update Dynamic Configuration
Enter a treatment name in the
Treatmentfield. Provide a JSON configuration in the editor, or leave the value empty to clear any previously set configuration for that treatment.Click + Add Treatment to configure additional treatments.
Set Targeting Rules
Click + Add Rule to add a targeting rule. Click + Add to define conditions using a supported rule type. You can optionally negate a rule by clicking the Negate checkbox.
The following rule types are supported:
- In Segment
- In Feature Flag
- Boolean
- On Date
- On or After Date
- On or Before Date
- Between Dates
- Equal (Set)
- Any Of (Set)
- All Of (Set)
- Part Of (Set)
- Equal (Number)
- Less Than or Equal (Number)
- Greater Than or Equal (Number)
- Between (Number)
- In List (String)
- Starts With (String)
- Ends With (String)
- Contains (String)
- Matches (String)
- Equal To (Semver)
- Greater Than or Equal To (Semver)
- Less Than or Equal To (Semver)
- Between (Semver)
- In List (Semver)
Enter a segment identifier in the
Segmentfield. Click + Add to add an additionalANDcondition.Configure traffic allocation in the
Distribute treatment as followssection by assigning percentages per treatment. Click + Add Allocation to add an allocation.- In the
Treatmentfield, enter a treatment name. - In the
Size %field, enter a percentage.
Set Default Allocations
Configure percentage-based traffic allocation across treatments.
- In the
Treatmentfield, enter a treatment name. - In the
Allocation Percentagefield, enter a percentage value.
Click + Add Treatment to configure additional treatments.
Allocation PercentageThe total allocation across all treatments must equal 100.
Set Treatments
Configure treatments for the feature flag definition.
- In the
Treatmentfield, enter a treatment name. - In the
Descriptionfield, enter a description.
Click + Add Treatment to configure additional treatments.
Set Rollout Status
In the
Rollout Statusfield, select one of the following statuses:- Pre-Production
- 0% in Production
- Killed
- Internal Testing
- External Beta
- Ramping
- Experimenting
- 100% Released
- Removed from Code
- Permanent
Kill/Restore Flag
In the
Actionfield, select one of the following:- Kill
- Restore
- Optionally, enter keys to add in the
-
Add additional changes by clicking + Add a Flag Change. Each change type can be used at most once per step.
-
In the
Optional Configurationsection, you can configure treatments if the flag definition does not already exist in the target environment. These settings are ignored when a flag definition already exists.To configure treatments:
- Click + Add Treatment.
- Enter a treatment name.
- Optionally, enter a description.
- Repeat as needed for additional treatments.
Then configure the following:
- In the
Default Treatmentfield, select a default treatment. - In the
Baseline Treatmentfield, select a baseline treatment.
-
Click Apply Changes to add the step to the pipeline.
Create Segment
Use this step to create a standard, large, or rule-based segment for feature flag targeting.
-
In your pipeline stage, click + Add Step.
-
Select Create Segment under Feature Management & Experimentation in the Step Library.
-
In the Step Parameters tab, configure the following:
- Name: Add a step name (such as
Create Segment). - Segment Name: Add a name for the segment.
- Traffic Type: Select the traffic type for the segment.
- Description: Optionally, enter a description for the segment.
- Owners: Optionally, select one or more owners for the segment.
- Tags: Optionally, select one or more tags for the segment.
- Name: Add a step name (such as
-
Click Apply Changes to add the step to the pipeline.
Update Segment
Use this step to update segment metadata without changing segment targeting behavior.
-
In your pipeline stage, click + Add Step.
-
Select Update Segment under Feature Management & Experimentation in the Step Library.
-
In the Step Parameters tab, configure the following:
- Name: Add a step name (such as
Update Segment). - Segment Name: Add the name of the existing segment.
- Description: Optionally, update the segment description.
- Owners: Optionally, update segment ownership.
- Tags: Optionally, select one or more tags for the segment.
- Name: Add a step name (such as
-
Click Apply Changes to add the step to the pipeline.
Delete Segment
Use this step to permanently delete a segment.
-
In your pipeline stage, click + Add Step.
-
Select Delete Segment under Feature Management & Experimentation in the Step Library.
-
In the Step Parameters tab, configure the following:
- Name: Add a step name (such as
Delete Segment). - Segment Name: Add the name of the segment to delete.
- Name: Add a step name (such as
-
Delete all segment definitions is selected by default. Click Apply Changes to add the step to the pipeline.
Add/Remove Segment Targets
Use this step to incrementally add or remove target keys from a segment in a specific environment.
-
In your pipeline stage, click + Add Step.
-
Select Add/Remove Segment Targets under Feature Management & Experimentation in the Step Library.
-
In the Step Parameters tab, configure the following:
- Name: Add a step name.
- Segment Name: Add the name of the segment.
- Environment: Specify the environment.
- Add Keys: Optionally, specify one or more targeting keys to add to the segment.
- Remove Keys: Optionally, specify one or more targeting keys to remove from the segment.
-
Click Apply Changes to add the step to the pipeline.
Set Rule-Based Segment Targeting
Use this step to define or replace targeting rules for a rule-based segment.
-
In your pipeline stage, click + Add Step.
-
Select Set Segment Targeting Rules under Feature Management & Experimentation in the Step Library.
-
In the Step Parameters tab, configure the following:
- Name: Add a step name.
- Segment Name: Add the name of the segment.
- Environment: Specify the environment.
-
Under the Targeting Rules section, configure one or more targeting rules. To add a targeting rule, click + Add Rule.
- Exclude Keys: Optionally, specify one or more targeting keys to exclude.
- Exclude Segments: Optionally, specify one or more segments to exclude.
- Comment: Optionally, include a comment.
- Title: Optionally, enter a title for the targeting rule.
-
Click Apply Changes to add the step to the pipeline.
Create Flagset
Use this step to create a flagset for organizing related feature flags.
-
In your pipeline stage, click + Add Step.
-
Select Create Flagset under Feature Management & Experimentation in the Step Library.
-
In the Step Parameters tab, configure the following:
- Name: Add a step name (such as
Create Flagset). - Flagset Name: Add a name for the flagset.
- Description: Optionally, enter a description for the flagset.
- Name: Add a step name (such as
-
Click Apply Changes to add the step to the pipeline.
Delete Flagset
Use this step to permanently delete a flagset.
-
In your pipeline stage, click + Add Step.
-
Select Delete Flagset under Feature Management & Experimentation in the Step Library.
-
In the Step Parameters tab, configure the following:
- Name: Add a step name (such as
Delete Flagset). - Flagset Name: Add the name of the flagset to delete.
- Name: Add a step name (such as
-
Click Apply Changes to add the step to the pipeline.
Add/Remove Flags from Flagsets
Use this step to add or remove feature flags from existing flagsets.
-
In your pipeline stage, click + Add Step.
-
Select Add/Remove Flags from Flagsets under Feature Management & Experimentation in the Step Library.
-
In the Step Parameters tab, configure the following:
- Name: Add a step name.
- Environment: Specify the environment.
- Feature Flag: Specify the feature flag.
- Add Flag sets: Specify one or more flag sets to add to the feature flag.
- Remove Flag sets: Specify one or more flag sets to be removed from the feature flag.
-
Click Apply Changes to add the step to the pipeline.
Set Impression Tracking
Use this step to enable or disable impression tracking for a feature flag.
-
In your pipeline stage, click + Add Step.
-
Select Set Impression Tracking under Feature Management & Experimentation in the Step Library.
-
In the Step Parameters tab, configure the following:
- Name: Add a step name.
- Environment: Specify the environment.
- Feature Flag: Specify the feature flag.
- Impression Tracking: Enable or disable impression tracking.
-
Click Apply Changes to add the step to the pipeline.
Once you have added FME steps to a Custom stage and designed your pipeline, click Save and execute the pipeline by clicking Run.
Advanced Pipeline Configuration
You can also control how an FME step runs or recovers by configuring conditional execution, failure strategy, and looping strategy settings on the Advanced tab of each step.

Conditional execution lets you run or skip FME steps based on pipeline variables, expressions, or runtime inputs. For example, you can update a feature flag only in production or configure a flag kill step to run only if the previous deployment step fails.
If both a stage and a step define conditional execution rules, the step-level condition takes precedence and overrides the stage-level condition.
Pipeline notifications
You can create notification rules to send notifications about events in your pipeline and notify your team using Slack, Microsoft Teams, Email, or PagerDuty as one of the notification channels.
Advanced options
To configure how your pipeline executes and behaves under different conditions, click Advanced Options in the Pipeline Studio sidebar.
- Pipeline Timeout Settings
- Stage Execution Settings
- Re-run Settings
Set a timeout for the entire pipeline. If a pipeline run exceeds the configured duration, it will automatically fail.
Choose whether to allow selective stage execution. This setting controls whether stages can be run or skipped based on stage-level execution rules.
Control whether input data is editable when re-running a pipeline. If set to No, inputs cannot be modified during reruns.