SonarQube Integration
The SonarQube integration connects to your SonarQube Server (self-hosted) or SonarQube Cloud instance and brings projects into the IDP Catalog. Once ingested, entities can be registered as new catalog entries or merged into existing ones, enriching them with SonarQube-sourced metadata such as:
- Code quality measures
- Security hotspots
- Quality gate status
- Issue analytics
For each project, the integration collects the following:
| Resource | What it provides |
|---|---|
| Project | Quality gate status, reliability rating, security rating, SQALE rating, line and branch coverage, duplication metrics, code size, bugs, vulnerabilities, security hotspots, and code smells. |
Before you begin
The following are needed to get the integration running:
- Ensure the feature flag
IDP_INTEGRATIONSis enabled. Contact Harness Support to enable them. - You have the required RBAC permissions to manage integrations. All integration operations require the
IDP_INTEGRATION_EDITpermission on theIDP_INTEGRATIONresource type. - A SonarQube user token with global-level
Browseprivileges is available. Generate it via My Account → Security → Generate Tokens in SonarQube.
If your environment blocks outbound third-party traffic and routes it through a proxy, you will need to configure proxy settings on your Harness Delegate. Once configured there, the proxy settings are automatically picked up by IDP integrations. No additional setup is needed on the integration side.
Here is how to set it up: Configure delegate proxy settings
Enable the SonarQube integration
The SonarQube integration is available at the Account, Organization, and Project levels of Harness. Navigate to the appropriate scope of the Internal Developer Portal to add or manage SonarQube integrations.
1. Navigate to the integrations page
-
In Harness, open the Internal Developer Portal.
-
From the left sidebar, click Configure.
-
In the left navigation menu, click Integrations.
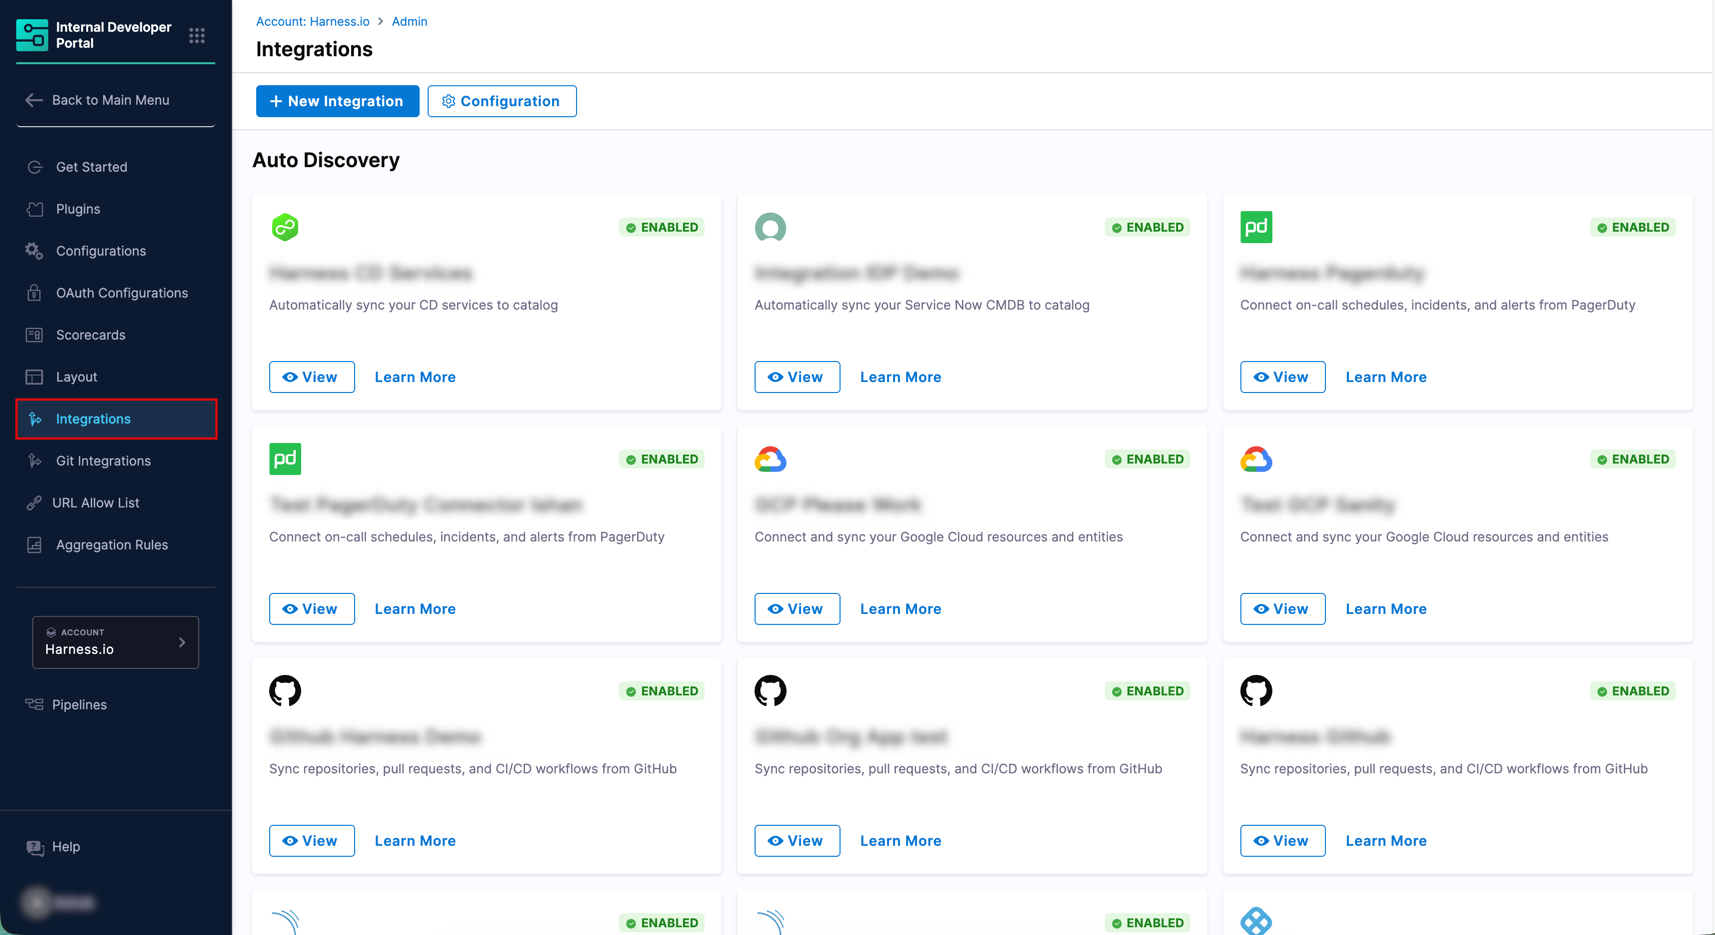
Figure 1: Navigation Path of SonarQube Integration -
On the Integrations page, click + New Integration at the top.
-
Select SonarQube from the integration type picker. You will be taken to the Auto Discover SonarQube Integration page.
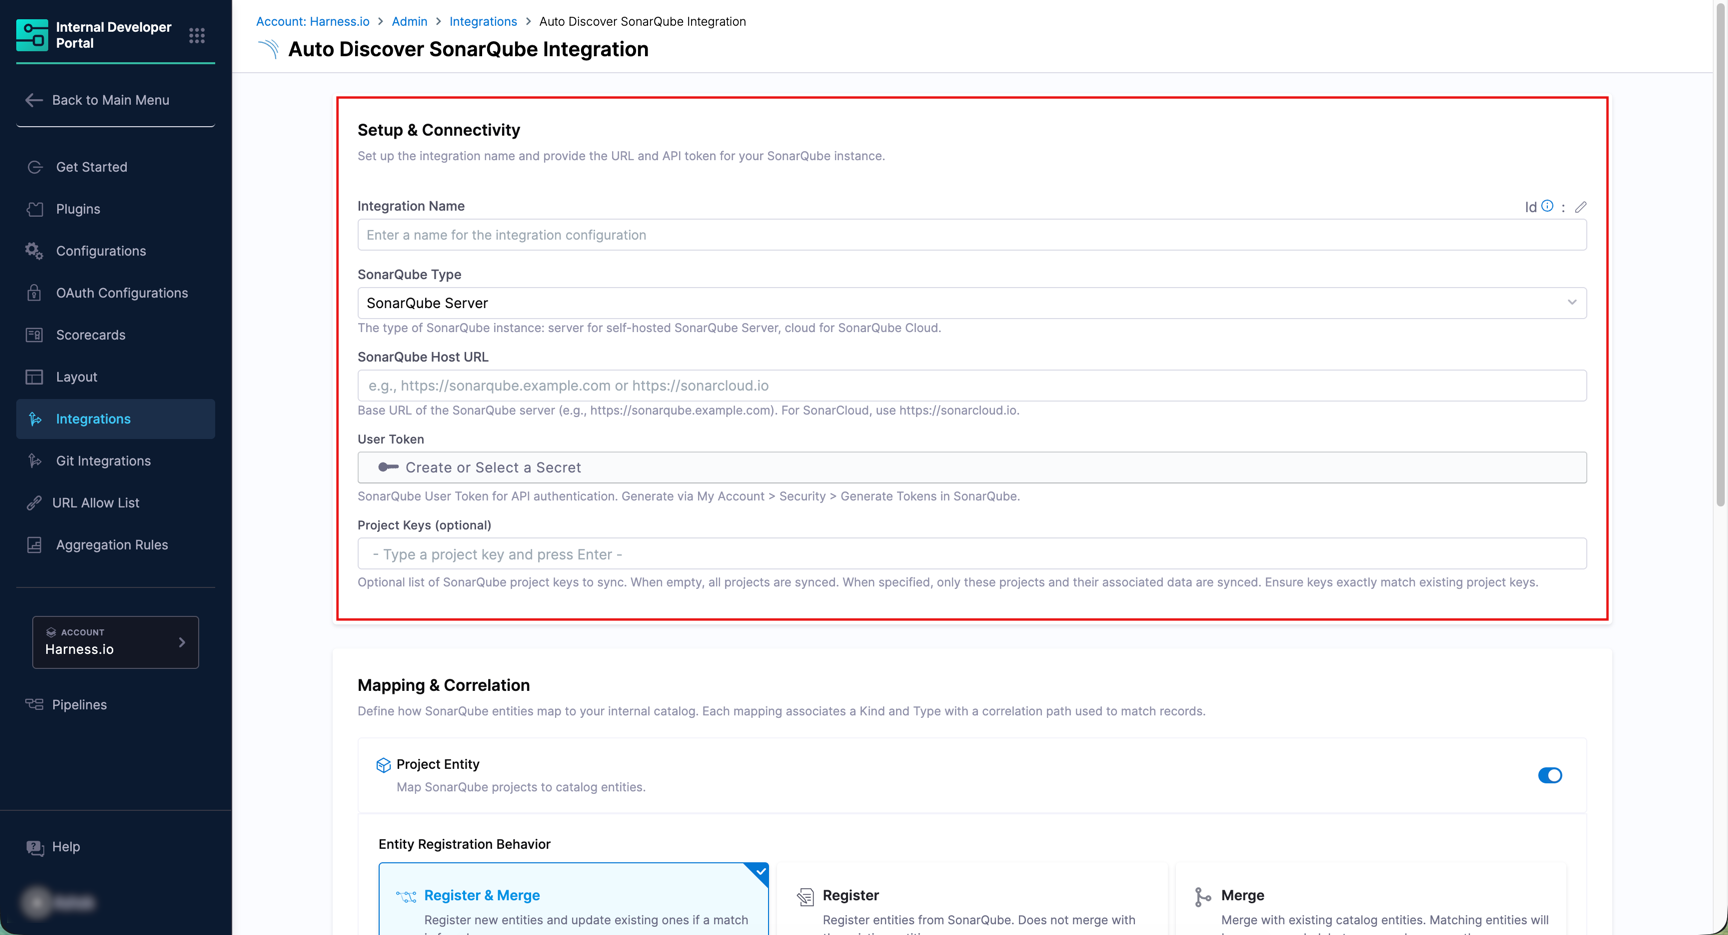
2. Configure setup & connectivity
This section connects Harness IDP to your SonarQube instance.
-
Enter a name in the Integration Name field. This name appears on the integration card on the Integrations page (e.g.,
SonarQube Production). -
Select the SonarQube Type from the dropdown:
- SonarQube Cloud - for cloud-hosted SonarQube (sonarcloud.io).
- SonarQube Server - for self-hosted, on-premises SonarQube.
-
Enter the SonarQube Host URL:
- For SonarQube Server, this is the base URL of your instance (e.g.,
https://sonarqube.example.com). - For SonarQube Cloud, use the regional endpoint for your organization:
- Global:
https://sonarcloud.io - US region:
https://sonarqube.us
- Global:
- For SonarQube Server, this is the base URL of your instance (e.g.,
-
(SonarQube Cloud only) Enter the Organization Key. This is your SonarQube Cloud organization key (e.g.,
my-org). -
Under User Token, click Create or Select a Secret and provide your SonarQube User Token. This token must have global-level
Browseprivileges.Recommended Secrets ManagerFor SonarQube Integration, we recommend you use the Harness Built-in Secret Manager for storing the SonarQube user token.
-
(Optional) Enter one or more Project Keys to limit the sync scope. Type a project key and press Enter to add it. When left empty, all projects in your SonarQube instance or organization are synced.
Scoping Your IntegrationEvery project in SonarQube has a unique project key. Use these to scope each integration appropriately. We recommend creating one integration per project or small group of projects rather than a single integration covering all projects. This makes it easier to manage sync frequency, troubleshoot issues, and control catalog growth.
Check Network ReachabilityFor SonarQube Server (self-hosted) instances, ensure that your SonarQube instance is reachable from within the environment where your Harness Delegate is running. The delegate must have network access to the SonarQube Host URL you configure.
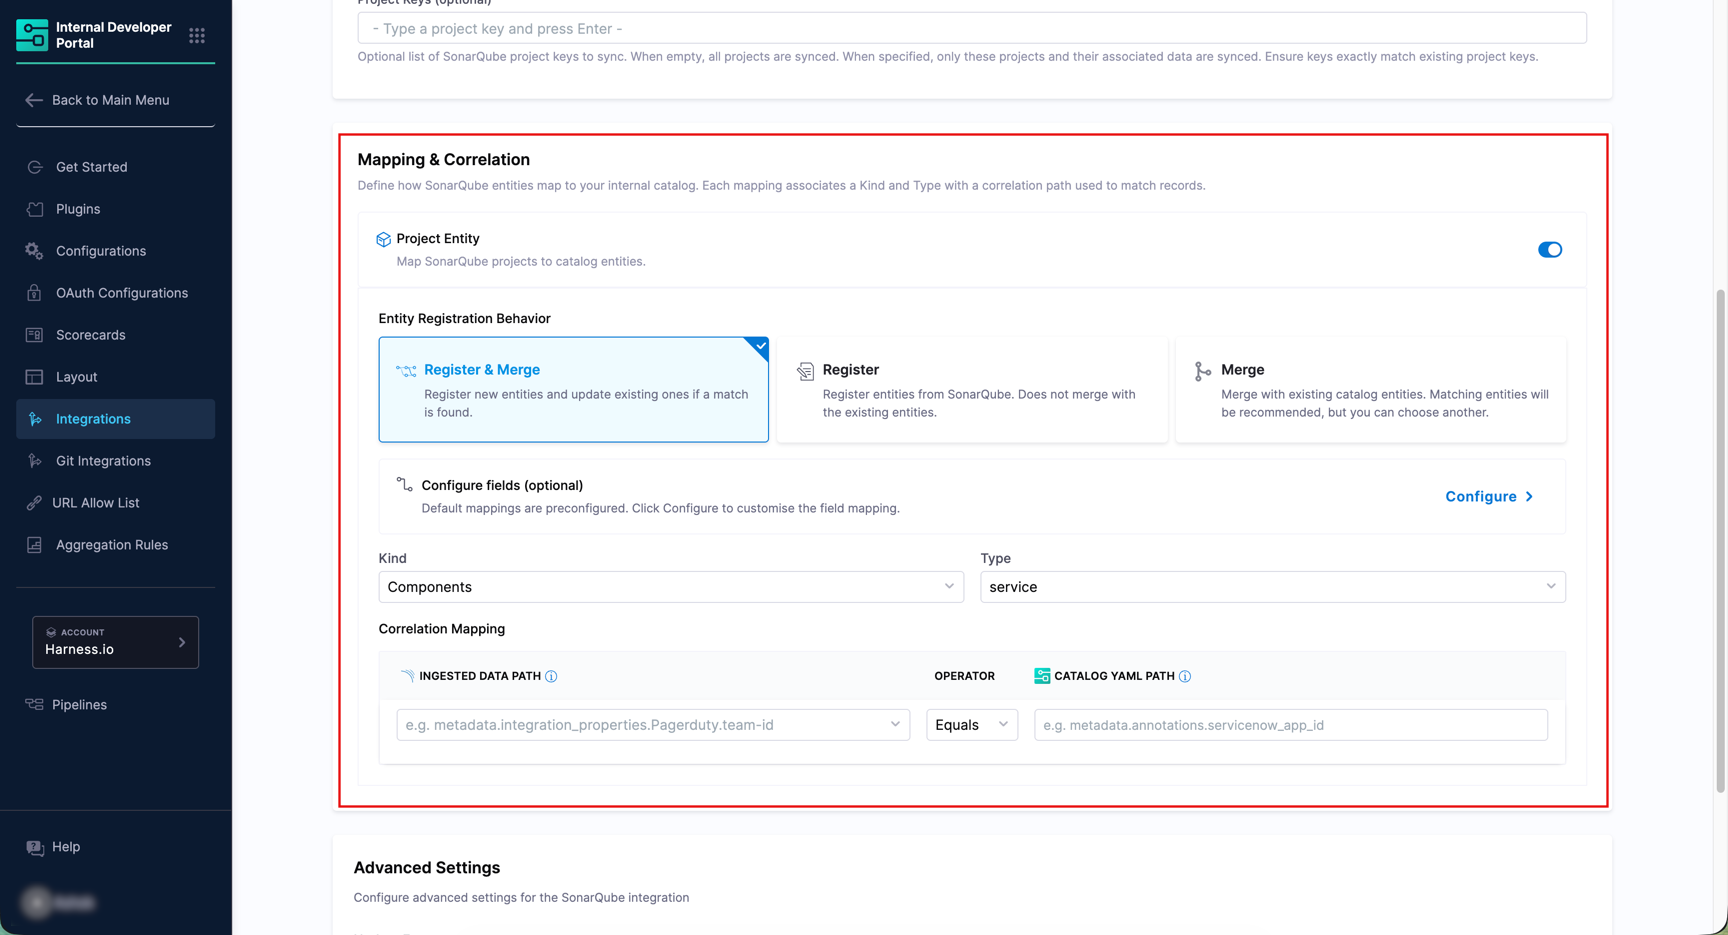
3. Configure mapping & correlation
This section defines how SonarQube projects are mapped to IDP catalog entities and how they are correlated with existing catalog records.
The integration supports the Project Entity type, which imports SonarQube projects as catalog components.
Project entity
-
Ensure the Project Entity toggle is turned on.
-
Under Entity Registration Behavior, choose how projects are brought into the catalog:
- Register & Merge (Default) - Registers new entities and updates existing ones when a match is found. This is the recommended option for most setups.
- Register - Creates new catalog entities from SonarQube projects. Does not merge with existing entities.
- Merge - Links discovered projects to existing catalog entities. Matching entities are recommended automatically, but you can choose a different one.
-
The default Kind is
Componentand Type isService. These are pre-configured and apply to all SonarQube project imports. -
Under Correlation Mapping, set the Ingested Data Path (from SonarQube) and the corresponding Catalog YAML Path (from your IDP entity) to define how records are matched. The operator defaults to
Equals. Example:Ingested Data Path Operator Catalog YAML Path nameEquals name -
Optionally, click Configure next to Configure fields (optional) to customize which SonarQube fields are synced to the catalog. By default, all available fields are selected.
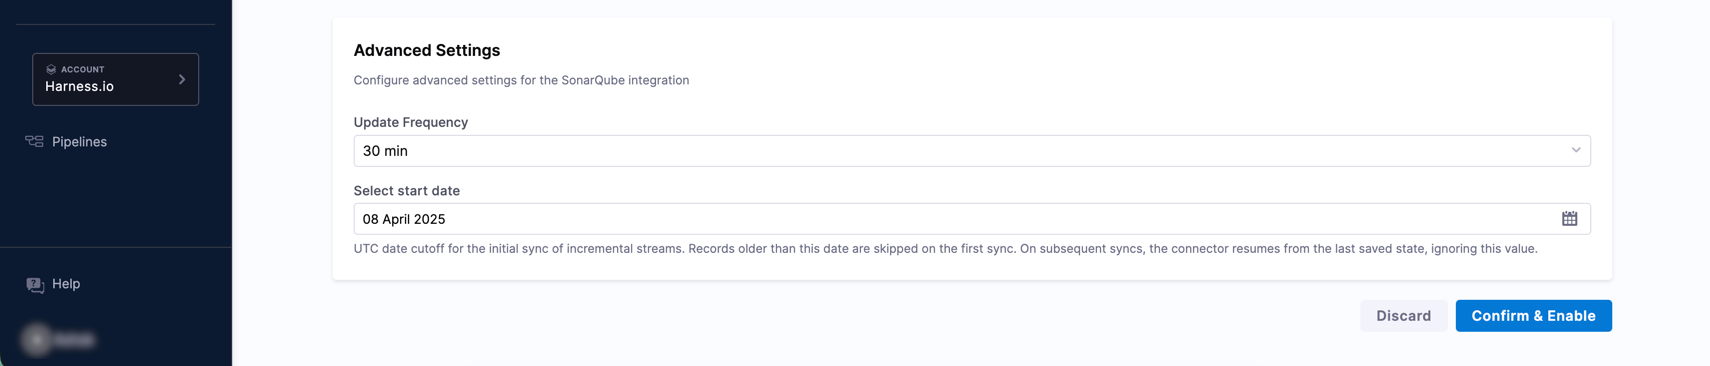
4. Configure advanced settings
The Advanced Settings section controls how frequently IDP syncs with SonarQube and, for SonarQube Cloud, how far back historical data is pulled.
-
Select an Update Frequency from the dropdown to control how often IDP polls SonarQube for new data.
Available options:
10 min,30 min,1 hour,3 hours,6 hours,12 hours,1 day,2 days,7 days. -
Set the Select start date to define the earliest date from which IDP will pull SonarQube data. Note that setting this date too far in the past might increase the volume of data pulled on the initial sync and slow it down.
-
Once all sections are configured, click Confirm & Enable. A confirmation dialog will appear before the changes are applied.
The integration is now enabled and IDP begins syncing data from SonarQube. Discovered projects appear in the Discovered tab.
Discover and import SonarQube entities
This section covers how to view the SonarQube entities discovered by the integration and import them into your IDP Catalog.
Discovered tab
After the integration runs, all SonarQube projects detected appear in the Discovered tab under the Project sub-tab. If entities do not appear, use the Sync button at the top right to manually refresh.
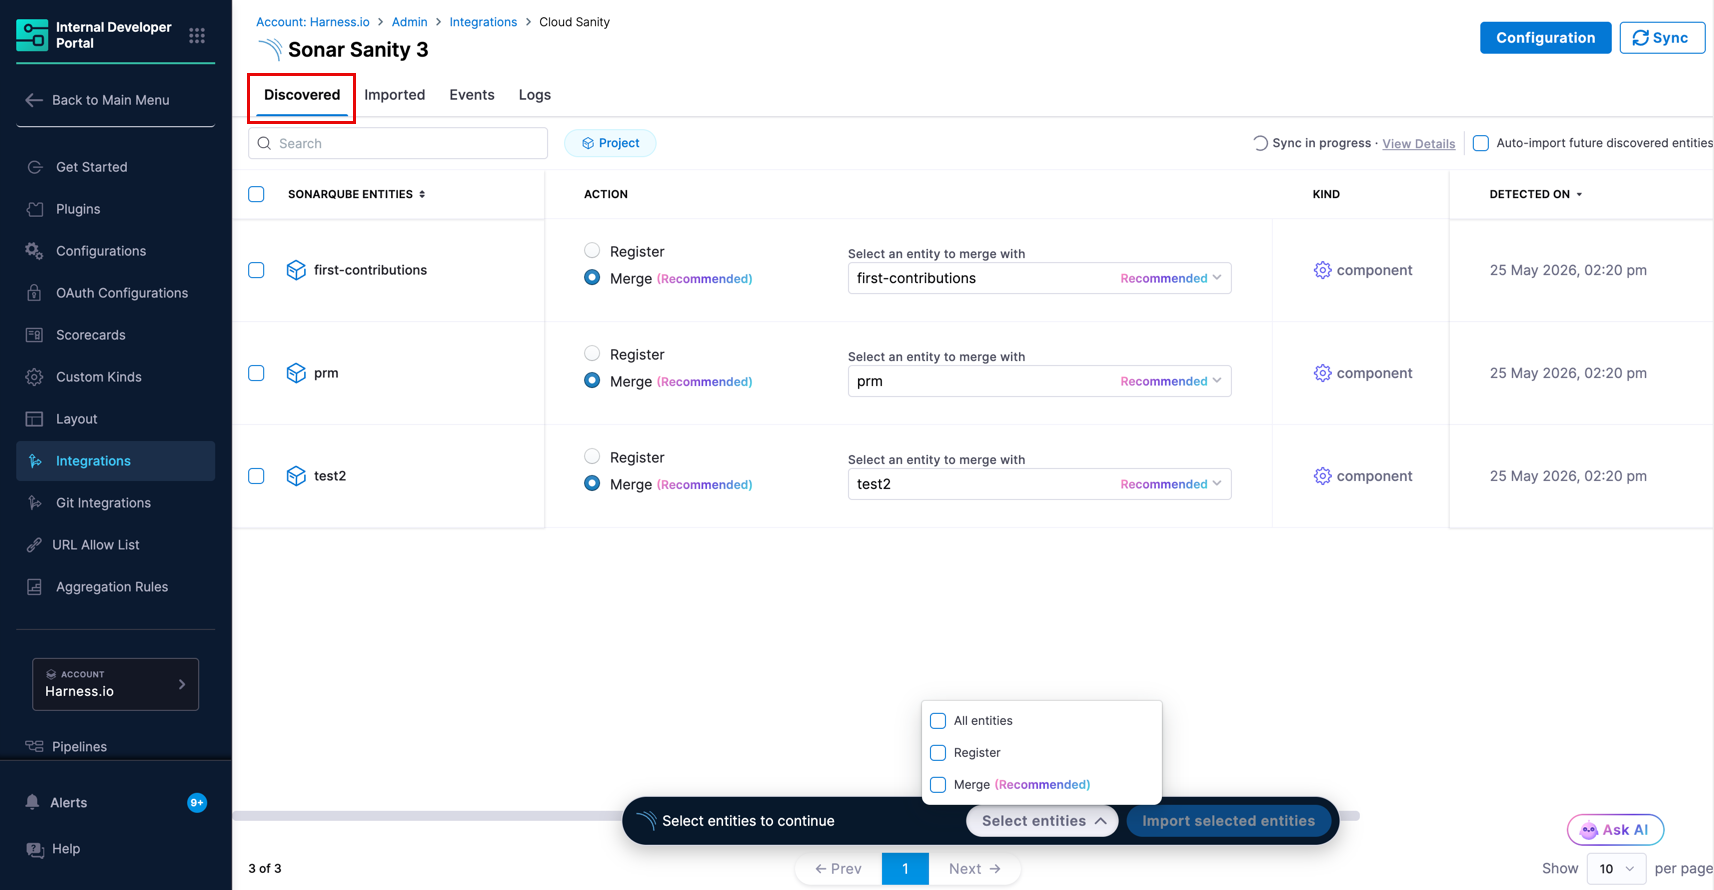
For each discovered entity, you can see its name, the recommended catalog action, kind, type, and the date it was detected. You can choose how to bring entities into the catalog using one of the following actions:
- Register (typically used when no matching catalog entity exists) - Creates a new catalog entity populated with the SonarQube metadata.
- Merge (shown as Recommended when a matching catalog entity is found) - Links the discovered entity to an existing catalog entity, enriching it with SonarQube data. If IDP finds a catalog entity with a matching name or correlation key, Merge is pre-selected and the suggested entity is shown automatically.
- Bulk Import - Select services individually using the checkboxes, or use the snackbar at the bottom of the page to bulk-select by action type. Open the dropdown to choose All services, Register, or Merge (Recommended), then click Import selected services.
- Auto Import - Toggle Auto-import future discovered services in the top right of the Discovered tab to automatically import all future entities without manual review. You can change this preference at any time.
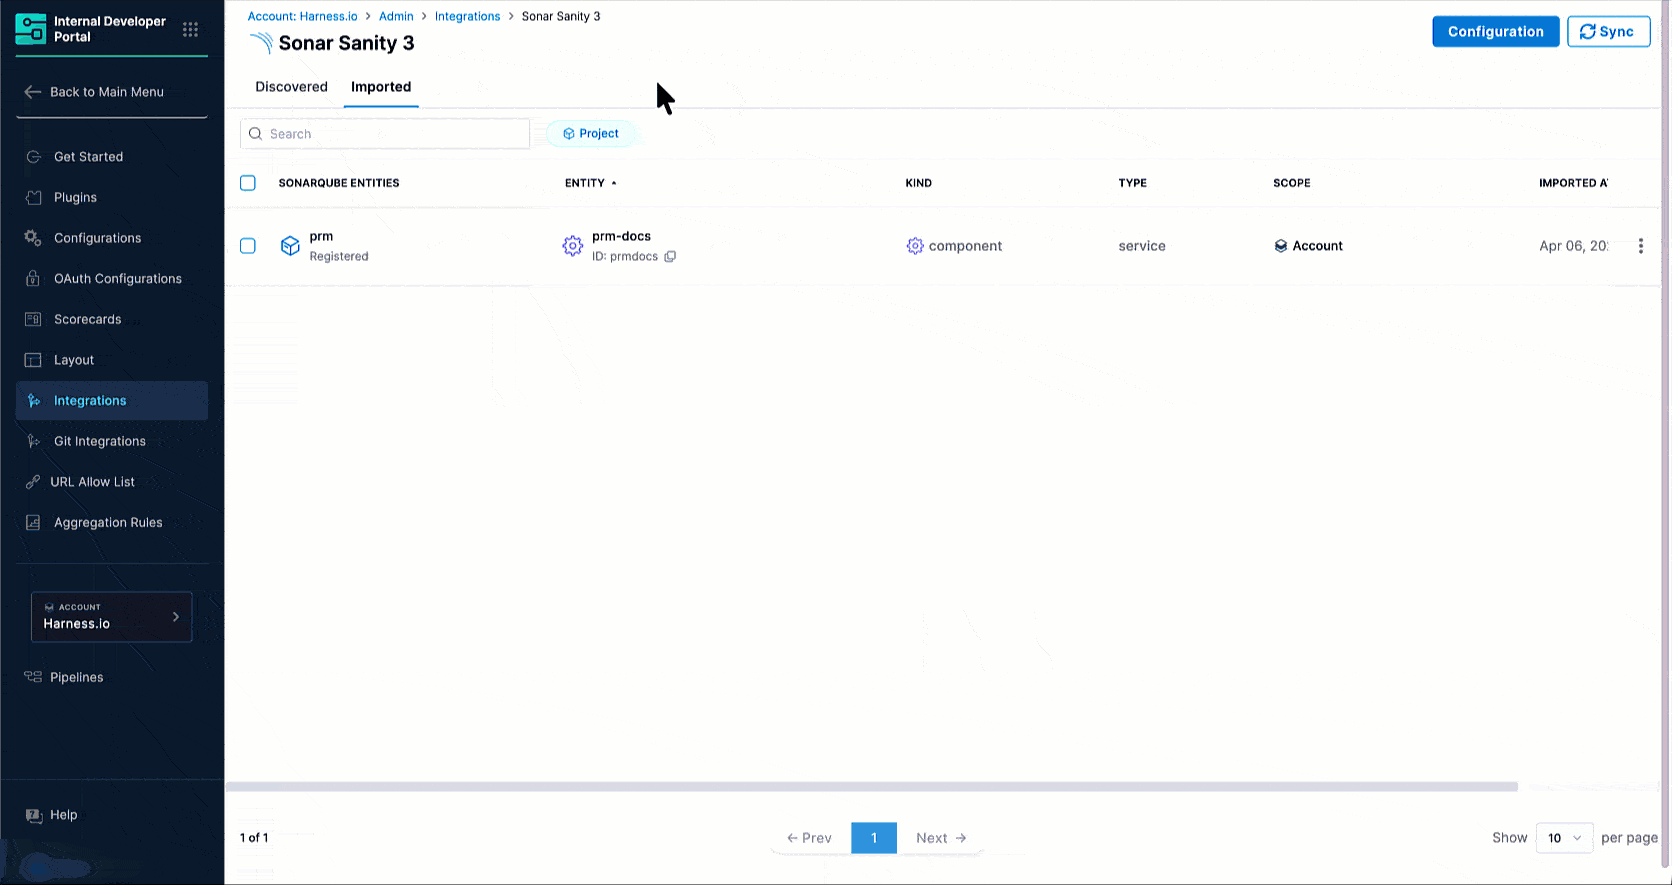
Imported tab
The Imported tab displays all SonarQube entities that have been brought into the catalog under the Project sub-tab.
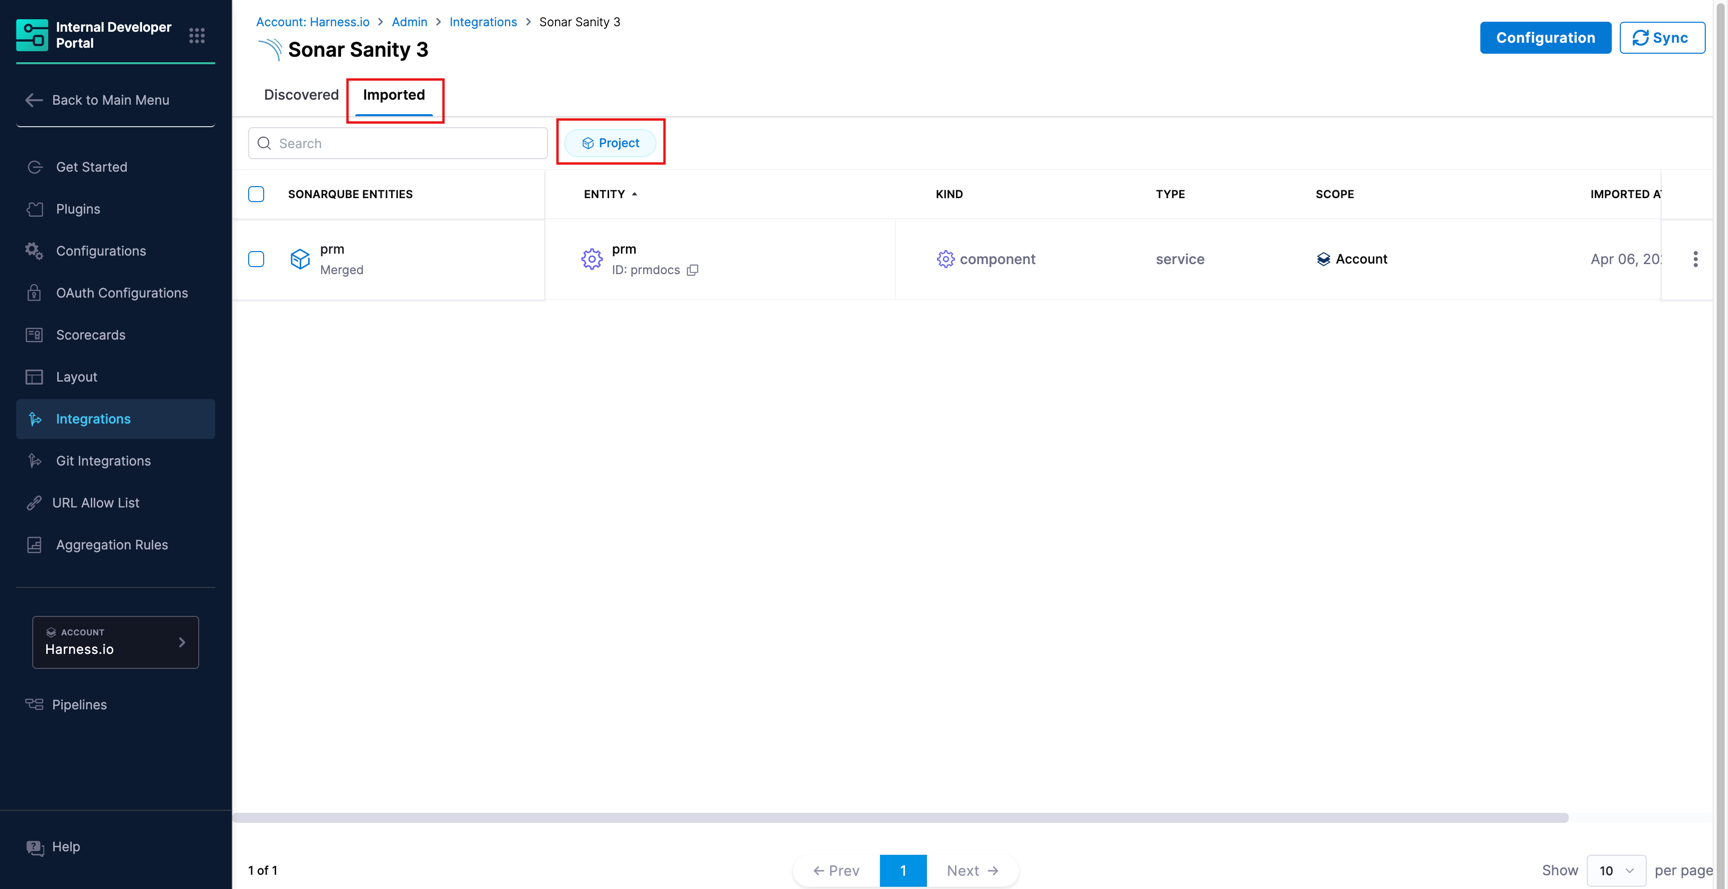
It displays the following data:
| Column | Description |
|---|---|
| SonarQube Entity | The name of the project from SonarQube, along with its import status (for example, Merged or Registered). |
| Entity | The linked IDP catalog entity and its ID. |
| Kind | The catalog entity kind (e.g., component). |
| Type | The catalog entity type (e.g., service). |
| Scope | The Harness scope the entity belongs to (e.g., Account). |
| Imported At | The timestamp when the entity was imported. |
To stop syncing a specific entity without deleting the catalog entity, use the three-dot menu on any row and select Unlink. This stops sync updates while keeping the IDP entity and its existing data intact.
Events tab
The Events tab logs all sync and lifecycle activity for this integration. Use it to verify that syncs are running, confirm that imports completed successfully, and investigate any failures.
For the full event type reference and detail panel fields, go to Integration Events.
View SonarQube entities in the catalog
Once imported, SonarQube entities are available in the Catalog section of IDP as standard catalog entities.
Each imported SonarQube project is registered with:
- Kind:
Component - Type:
Service - Scope: The Harness scope the integration belongs to
Open any entity to view SonarQube-sourced data directly on the entity details page. This data is displayed through two dedicated UI components: a card on the Overview tab and an Code Quality tab. Both require a one-time layout configuration, described in the next section.
Layout for SonarQube components
To display SonarQube data on the entity details page, you need to add the two SonarQube components to the relevant entity layout. This is a one-time configuration per entity kind and type.
-
From the left sidebar of IDP, go to Configure → Layout → Catalog Entities.
-
Edit the existing layout for your entity or create a new one.
-
Select the Entity Kind (e.g.,
component) and the Entity Type (e.g.,service) that matches your imported SonarQube entities. -
In the YAML editor, add the
IntegrationsContentcomponent inside the Overview tab'scontentsblock, and add a new Code Quality tab using theCodeQualityTabcomponent.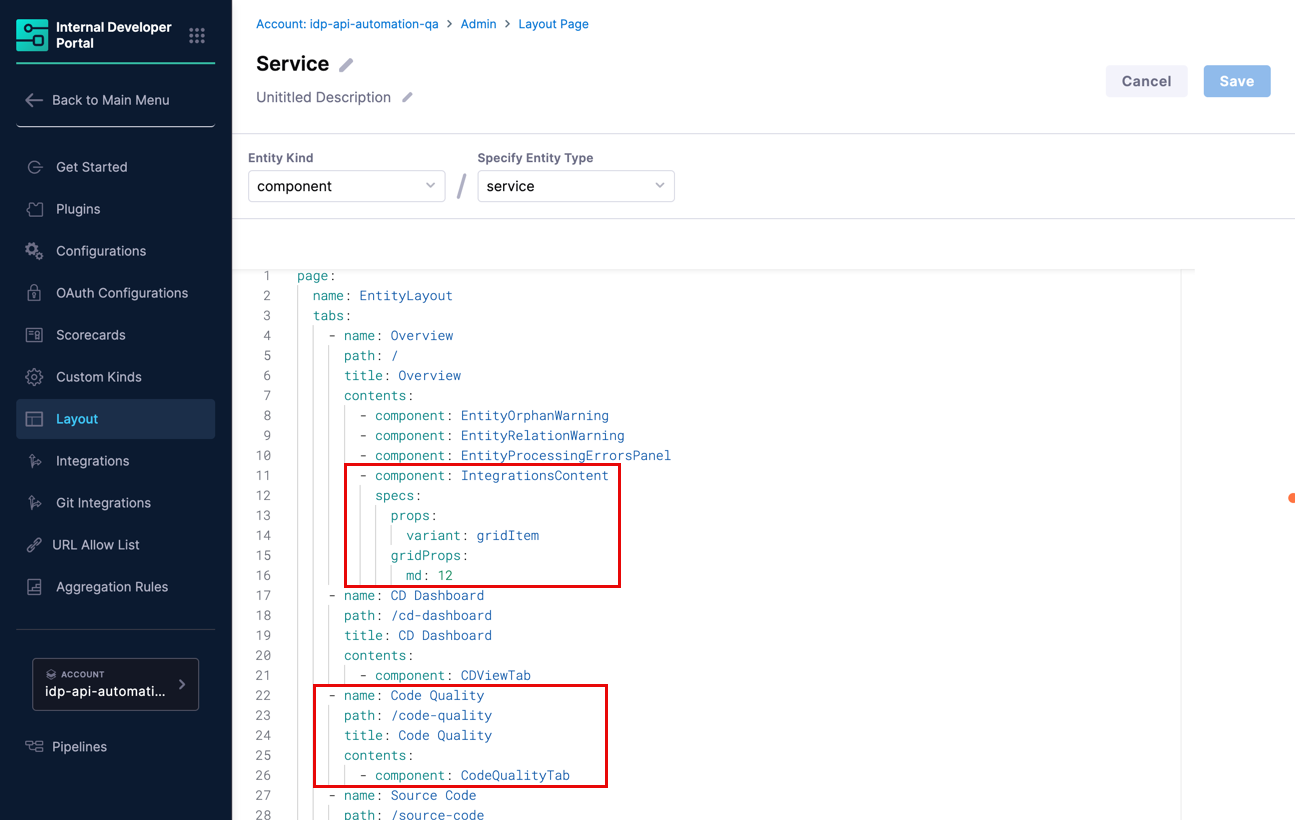
Figure 7: Layout configuration for SonarQube cards in Overview tab and Code Quality tab The relevant YAML additions are:
Inside the Overview tab's contents block- component: IntegrationsContentspecs:props:variant: gridItemgridProps:md: 12A new top-level tab entry- name: Code Qualitypath: /code-qualitytitle: Code Qualitycontents:- component: CodeQualityTab -
Click Save to apply the layout changes. The SonarQube components will now appear on all entity detail pages of the selected kind and type that have SonarQube data.
Cards in overview tab
After the layout is configured, a Code Quality card appears in the Overview tab of any entity that has SonarQube data linked to it. The card displays the key SonarQube metadata ingested for that entity, sourced from the entity's ingested properties.
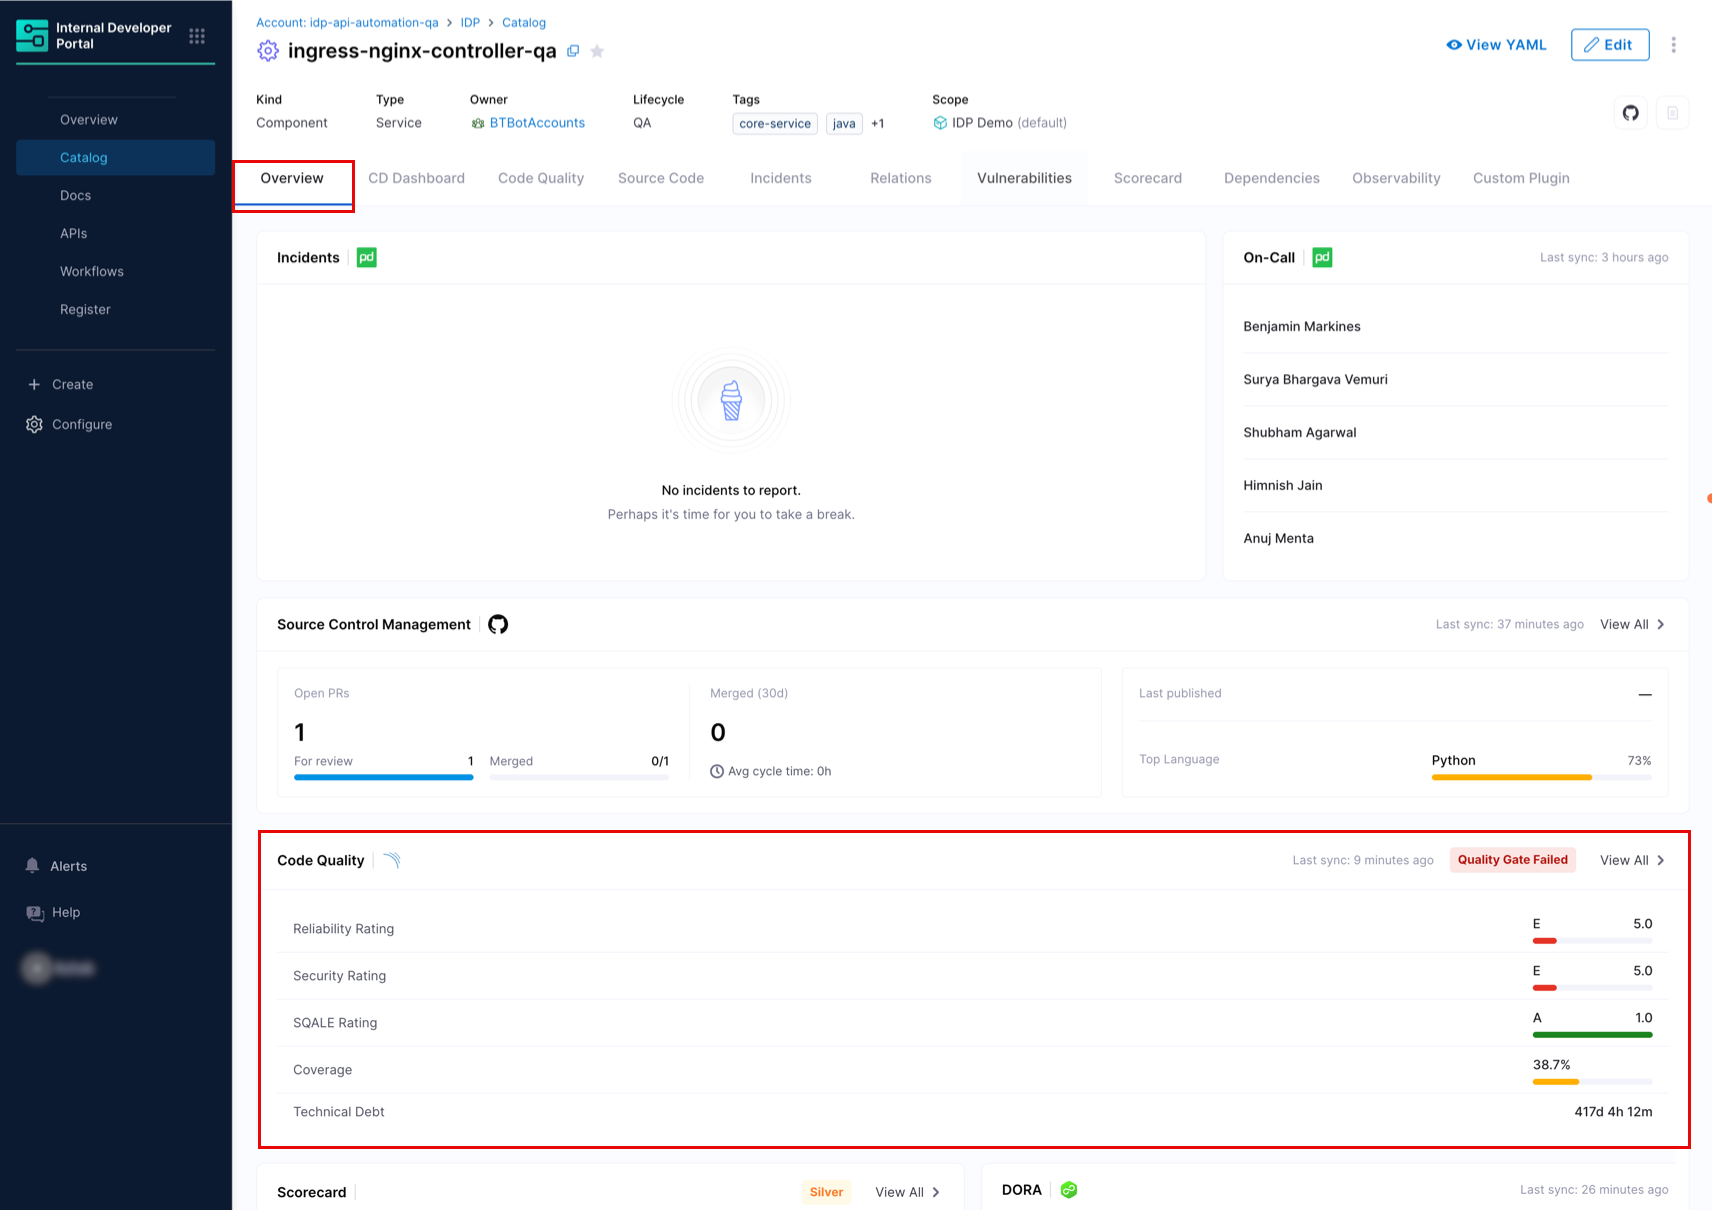
If the SonarQube integration has not been configured for the entity, the card shows a Not configured state with a link to the Integrations page.
Code quality tab
The Code Quality tab provides a more complete view of the SonarQube data for the entity. This tab fetches latest possible data using the integration ID and entity UUID.
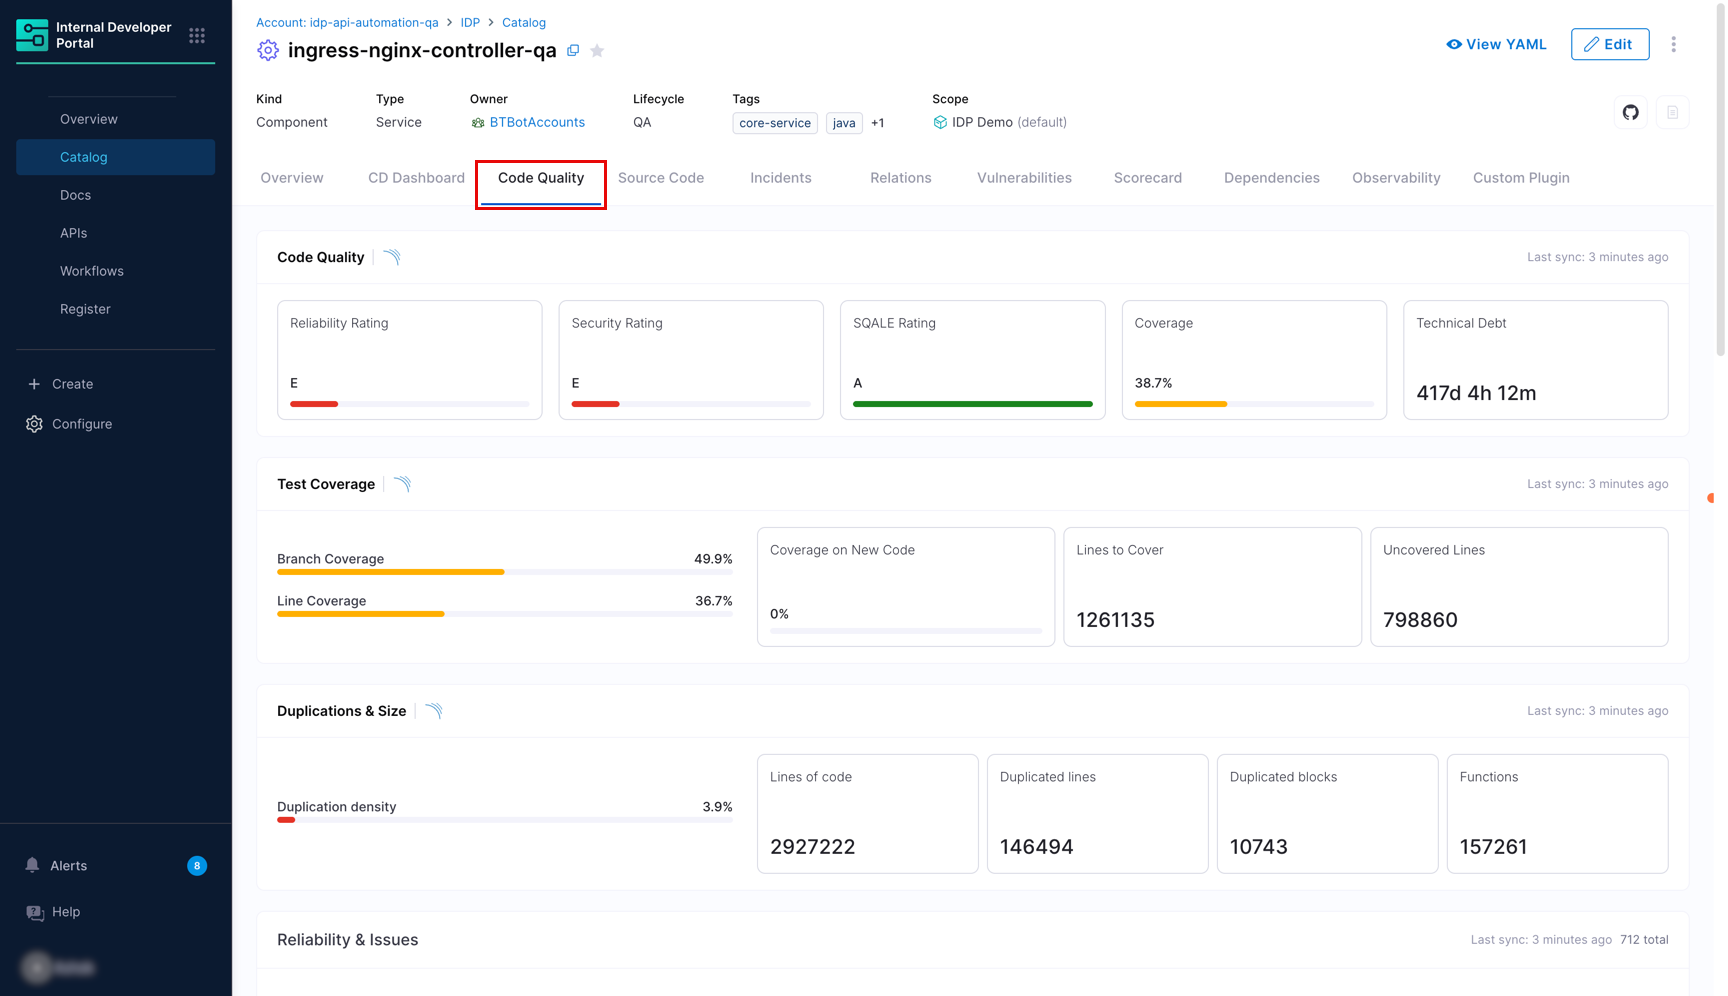
- The tab shows all available fields for the resource type, including fields not present in the Overview.
- All the fields are dynamic.
- All the cards display data last synced from SonarQube, based on your configured update frequency.
Ingested properties
To inspect the raw data ingested from SonarQube, open the entity and click View YAML → Ingested Properties in the Entity Inspector.
Ingested properties are stored in two sections of the entity YAML:
metadata.integration- Tracks which integrations are linked to this entity, including the entity action (e.g.,MERGE) and the linked entity UUID for each integration instance.integration_properties.SonarQube- Contains the SonarQube-specific data for the project entity, including top-level metadata fields and quality measures nested under themeasureskey.
Manage the SonarQube integration
Edit the integration
To update the integration name, change the host URL, token, or mapping and correlation settings, navigate to the Integrations page, find your SonarQube integration card, and click View. From there, click Configuration to open the edit screen.
Suspend auto-discovery
If auto-discovery is suspended, new entities will not appear in the Discovered tab. Existing imported entities remain unchanged in the catalog, and the sync between SonarQube and their corresponding IDP entities will stop.
To suspend auto-discovery:
- Go to Integrations and open your SonarQube integration using the View button.
- Click Configuration at the top.
- In the Danger Zone section, click Suspend.
- Confirm the action.
You may re-enable it at any time by following the same steps.