Install and Configure Harness CLI (hc)
Harness CLI (hc) v1.x.x will be deprecated and will reach end of life in a future release.
We recommend migrating to the new version of Harness CLI to continue receiving the latest features, improvements, and official support.
hc v1.x.x CLI is specific to Artifact Registry workflows only.
For a unified CLI experience across the Harness platform, use the new Harness CLI, which supports automation, resource management, and extensibility across all Harness modules.
Harness CLI (hc) v1.x.x is a command-line interface that only works with Harness Artifact Registry workflows. It enables you to manage artifact registry resources and automate common artifact management tasks directly from your terminal.
This section covers installation, configuration, and upgrade of the Harness CLI for Artifact Registry workflows.
Installation
Install the Harness CLI on Unix-based systems (macOS, Linux) using the following command:
curl https://raw.githubusercontent.com/harness/harness-cli/v2/install | sh
This script will download and install the latest version of the CLI to your system.
Version Check
After installing the CLI, verify the installation by checking the version:
hc version
Example output:
hc version dev
Built with go1.24.9
Upgrade to Latest Version
To ensure you have the latest features and bug fixes, upgrade the Harness CLI to the latest version:
hc upgrade
Authentication Setup
To authenticate the CLI with your Harness account, use the login command:
hc auth login
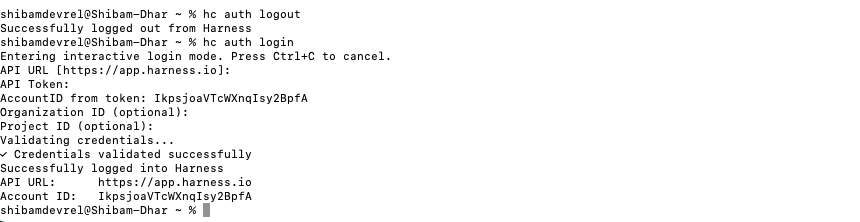
You will be prompted to provide the following details:
- URL: Your Harness platform URL
- API Token Key: Your personal access token or API key (learn how to create API keys)
- Account ID: Your Harness account identifier
- Organization ID: Your organization identifier (optional)
- Project ID: Your project identifier (optional)
Once authenticated, the CLI will store your credentials securely for subsequent commands.
Use hc [command] --help to get more information about any command. This will display available options, flags, and usage examples for the specified command.
Basic Verification
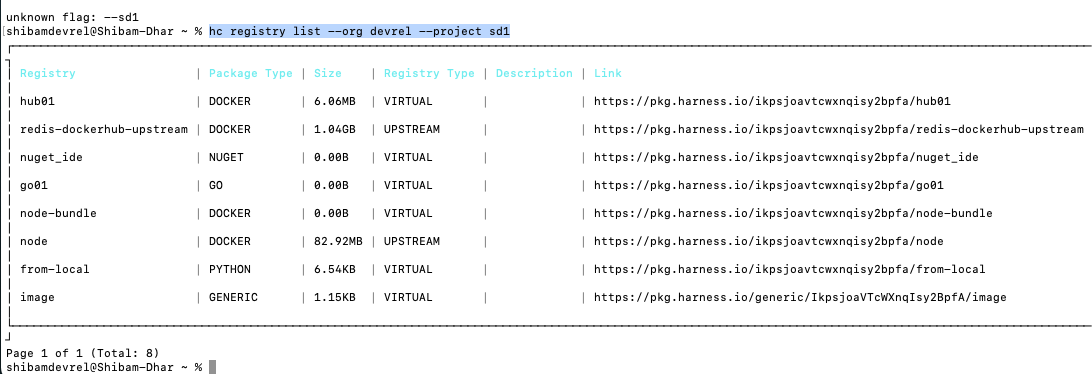
After authentication, verify your connection by performing a basic operation, for example, listing your registries:
<!-- List registries in the devrel org and sd1 project -->
hc registry list --org devrel --project sd1
This command should display your available registries, confirming a successful connection.
Using the CLI Binary
If you've downloaded the CLI binary directly, you may need to run it using ./hc from the directory where it's located:
./hc version
Adding to PATH
To use hc from anywhere without the ./ prefix, add the CLI binary to your system PATH:
macOS/Linux:
-
Move the binary to a directory in your PATH (e.g.,
/usr/local/bin):sudo mv hc /usr/local/bin/ -
Make sure it's executable:
sudo chmod +x /usr/local/bin/hc -
Verify you can now use
hcfrom anywhere:hc version
Alternative: Add to PATH without moving
If you prefer to keep the binary in its current location, add that directory to your PATH:
export PATH=$PATH:/path/to/directory/containing/hc
To make this permanent, add the above line to your shell configuration file (~/.bashrc, ~/.zshrc, or ~/.bash_profile).