Pipeline settings
As an account administrator, you can configure global pipeline settings and enforce limits on the usage of pipelines in your account.
Some default limitations are applied on pipeline executions and resource consumption depending on your plan tier. Some settings can be modified within individual pipelines or globally by an administrator. Some settings cannot be modified.
What you will learn in this topic
- How to configure account-level default pipeline settings for triggers, concurrency, and timeouts.
- How to find the fixed pipeline settings that you cannot modify.
Pipeline Default Settings
You can configure Default Settings at the account, organization, and project scopes. There are various categories of Default Settings.
These are the Default Settings for Pipelines.
Pipeline triggers settings
- Mandate pipeline create and edit permission to create and edit triggers: If enabled, users must have permission to create/edit pipelines to create/edit triggers for those pipelines. If disabled, users with permission to create/edit triggers can create/edit triggers regardless of their access to create/edit the pipelines associated with the triggers.
- Webhook Polling For Triggers
- Mandate Authorization for Custom Webhook Triggers: Enable this setting to require that all custom triggers in this Harness account use API key tokens. Go to Enforcing authorization for custom triggers to configure this requirement.
- Mandate Webhook Secrets for Github Triggers: Enable this setting to force secrets for Webhook triggers for authenticating the webhook call. For the secret to work with your webhook, you need to configure the repository webhook with the same secret after creating the trigger in Harness.
- Execute Triggers With All Collected Artifacts or Manifests: Enable this setting to allow all artifacts or manifests collected during the polling interval to trigger a deployment, with one deployment triggered for each artifact/manifest collected. Go to Trigger pipelines on a new artifact to understand this behavior.
- Enforce Executor Identity for Triggers: Enable this setting to require every trigger to carry an executor identity, so that trigger-started pipelines run under a specific user or service account's RBAC instead of the system principal. This setting is available only when the
PIPE_ENFORCE_TRIGGER_EXECUTOR_IDENTITYfeature flag is enabled, and can be set at the account, organization, and project scopes. Go to Trigger executor identity to configure executors.
Enable Pipeline Execution Audit Events
By default, the pipeline execution audit events such as Pipeline Start, Pipeline End, Stage Start, and Stage End are not displayed in the Audit Trail. Enable this setting to display these events.
Run RBAC Validation before executing Inline Pipelines
Currently, this feature is behind the feature flags CDS_PIPELINE_ABORT_RBAC_PERMISSION_MIGRATION and CDS_PIPELINE_ABORT_RBAC_PERMISSION. Contact Harness Support to enable the feature.
By default, before running any pipeline, Harness checks whether the user has access to all of the environments and other resources that the pipeline accesses. This check is run only for inline pipelines, not those stored in Git or other repositories.
Turn off this setting if the check is not required. Turning this off can cause pipelines to fail partway through execution (since later stages could have permission issues that have not been checked beforehand).
The Run RBAC Validation before executing Inline Pipelines setting is available in the account-level default settings.
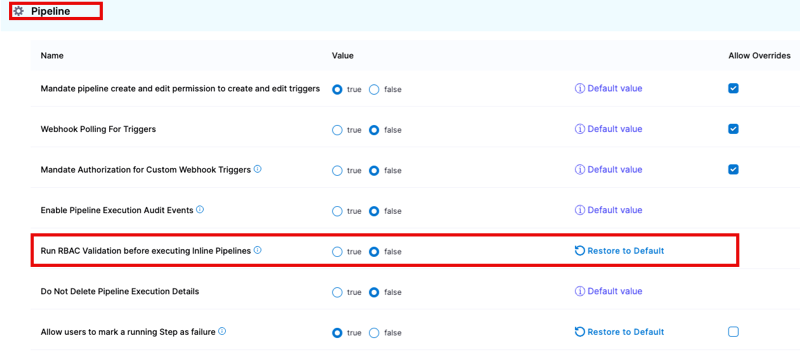
Do Not Delete Pipeline Execution Details
When this is set to true, pipeline executions history remains in the system even when the corresponding pipelines are deleted. You can view these executions in the Pipeline Executions list and open them to view details, but you cannot re-run them. When this is set to false, Harness deletes all executions of a pipeline when that pipeline is deleted.
Note that this does not retain execution details indefinitely. Pipeline execution data is still removed as part of the Harness data retention process.
Allow users to mark a running Step as failure
Enable this setting to allow users to manually fail in-progress steps.
Export Service Variables as Env Variables
Enable this setting to export service variables as environment variables in Shell Script steps.
Enable Matrix Labels By Name
Enable this setting to use the names of the matrix indices as labels. By default, Harness uses indices for the matrix naming strategy (stages are named with indices like _2_2, _1_3, and so on). If you prefer, you can customize this naming convention for better readability. Go to Use matrix axes as stage labels to customize the naming convention.
Enable Json Support for expressions
Enable this setting to write expressions using any JSON parser tool.
Save Blank Fields as Empty String settings
These settings depend on the CDS_ENABLE_RAW_MODE feature flag. Contact Harness Support to enable it.
By default, a runtime input left blank in an input set is encoded as <+input> and resolves to null at execution time. These two account-level settings help you preserve a blank field as an empty string ("") instead, so behavior stays consistent whether or not you run with an input set.
- Show checkbox to Save Blank Fields as Empty String (
display_raw_mode_setting): Shows the Save Blank Fields as Empty String checkbox in the Input Set section, in trigger input sets, and in the Pipeline Run form. - Default Value of Blank Fields Checkbox (
default_raw_mode_setting_value): Selects the Save Blank Fields as Empty String checkbox by default wherever it appears.
Go to Handle empty strings in input variables to walk through the behavior with a full pipeline example.
Default Image Pull Policy For Add On Container
Use this setting to set the image pull policy for the internal Harness images that run inside a pod along with your containers. For example, you can pull all images using a pull policy of Always (the default setting), or you can select Never because you expect the image to be present in the cluster already.
Concurrent active pipeline executions
This is the number of concurrent pipeline executions allowed per execution API request. The setting considers only those executions that are in progress (including those that are paused temporarily by steps such as the wait step or approval step), not those that have executed to completion.
The default concurrency limits vary by plan tier (ranging from 2 for Free plans to 500 for Enterprise and Essentials plans). Depending on your plan, you can increase these limits up to the maximum allowed for your tier.
Any executions that are triggered when the limit is reached are added to the execution queue. These executions and their deployments are not failed by Harness.
The concurrency limits are as follows for each plan tier:
| Plan Tier | Default | Maximum | Editable | Scope |
|---|---|---|---|---|
| Free plan and Team/Enterprise trials | 2 | 2 | No | Account |
| Team plan | 200 | 500 | Yes | Account |
| DevOps Essentials* | 60 | - | Contact Support | Account |
| Enterprise plan | 500 | 1000 | Yes | Account |
| Essentials (Flex Pricing) | 500 | 1000 | Yes | Account |
* Note: DevOps Essentials is on the deprecation path as part of the transition to Flex Pricing.
These concurrency limits are account wide and NOT per pipeline.
If you need limits beyond the maximum values specified above, contact Harness Support.
This setting can only be edited in Team and Enterprise plans. You can set it at the account scope only. You can configure the limit anywhere between 2 and the maximum.
Project-level pipeline execution concurrency
This feature is behind feature flags PIPE_PROJECT_LEVEL_EXECUTION_CONCURRENCY and PIPE_ENABLE_QUEUE_BASED_PLAN_CREATION. The per-project concurrency mode additionally requires the PIPE_PER_PROJECT_CONCURRENCY_OVERRIDES feature flag. Contact Harness Support to enable the feature.
Harness supports two mutually exclusive modes for managing pipeline execution concurrency across projects. Only one mode can be active for an account at a time.
| Mode | How it works | When to use it |
|---|---|---|
| High/Low priority partitions | Divides the account's concurrency capacity between High and Low priority partitions. Projects are assigned to one of the partitions. | Use this mode when you want to reserve capacity for critical projects or limit the capacity available to selected projects. Go to Configure High/Low priority partitions for setup steps. |
| Per-project concurrency | Assigns a concurrency limit independently to each project. You can define a default limit for all projects and override it for individual projects. | Use this mode when different projects require different concurrency limits and you need more granular project-level control. Go to Configure per-project concurrency for setup steps. |
Changing the Concurrency Mode affects pipeline executions across the account. Harness prompts you to confirm the change before applying it.
Both modes are subject to the account's total concurrency limit.
Stage/step-level concurrency limits
In addition to the concurrent execution limit across pipelines, Harness also imposes a concurrency limit within individual pipeline executions.
This limit defines the maximum number of steps or stages that can run simultaneously at runtime, and is especially relevant when using looping strategies like matrix or for-each with high parallelism.
Default concurrency limits (per execution)
These limits define the maximum number of steps or stages that can run concurrently within a single pipeline execution.
| Plan Tier | Max Concurrent Steps/Stages |
|---|---|
| Free plan and Team/Enterprise trials | 2 |
| Team plan | 50 |
| DevOps Essentials* | 60 |
| Enterprise plan | 100 |
| Essentials (Flex Pricing) | 100 |
* Note: DevOps Essentials is on the deprecation path as part of the transition to Flex Pricing.
Even if your pipeline defines up to 256 parallel steps or stages, only the first maxConcurrency steps will execute concurrently. The rest are queued until slots become available.
This limit exists to ensure fair usage and system stability. It is configurable internally based on your plan tier, but not editable by users via the UI.
Account-level step concurrency limit
This feature is behind the feature flag PIPE_USE_COUNTER_BASED_STEP_CONCURRENCY_GATE. Contact Harness Support to enable it for your account.
The per-execution concurrency limit controls the maximum number of steps or stages that can run simultaneously within a single pipeline execution.
To ensure fair resource allocation and platform stability, Harness also enforces an account-level step concurrency limit. This limit caps the total number of concurrently running steps across all pipeline executions in your account. This limit can be overridden for your account by Harness Support.
How the limit is applied
When a step becomes eligible to run, Harness evaluates the account-level concurrency limit.
- Harness checks whether the account-level step limit has available capacity.
- The step starts running only if capacity is available.
- If the limit has been reached, the step enters the Queued state.
- Queued steps automatically start when running steps complete and capacity becomes available.
Pipeline Timeout and Stage Timeout (execution time limits)
The timeout limit is the maximum allowable time a stage or pipeline can run.
By default, the Pipeline Timeout and Stage Timeout settings are set to the maximum for your plan tier. You can edit these limits to anything less than the maximum for your plan tier. If needed, you can configure different timeout limits at the account, organization, and project scopes.
Precedence of timeout settings
Priority order (highest to lowest):
- Account-level timeout (highest priority)
- Organization-level timeout
- Project-level timeout
- Pipeline-level timeout
- Stage-level timeout
- Step-level timeout (lowest priority)
Manually configuring a pipeline or stage to have a longer timeout than the system limit, the system limit is still enforced.
The maximum limits for each plan tier are as follows:
| Free plan | Team/Enterprise trials | Team plan | Enterprise plan | |
|---|---|---|---|---|
| Pipeline timeout | 2 hr | 4 hr | 30 days | 35 days |
| Stage timeout | 1 hr | 1 hr | 30 days | 35 days |
Pipeline graph zoom
This feature is behind the feature flag PIPE_GRAPH_VIEWPORT_PERSISTENCE. Contact Harness Support to enable the feature.
You can configure pipeline graphs to open zoomed to fit by default. You can also adjust the zoom level for an individual pipeline in the Pipeline Studio Visual editor, and Harness preserves your selection in your browser.
Set Zoom to Fit as the default
Perform the following steps to configure pipeline graphs to open zoomed to fit by default at the account, organization, or project scope.
- Navigate to Account/Organization/Project Settings > General > Default Settings > Pipeline.
- Locate Open Pipeline Graph Zoomed to Fit and select True.
- Select Save.
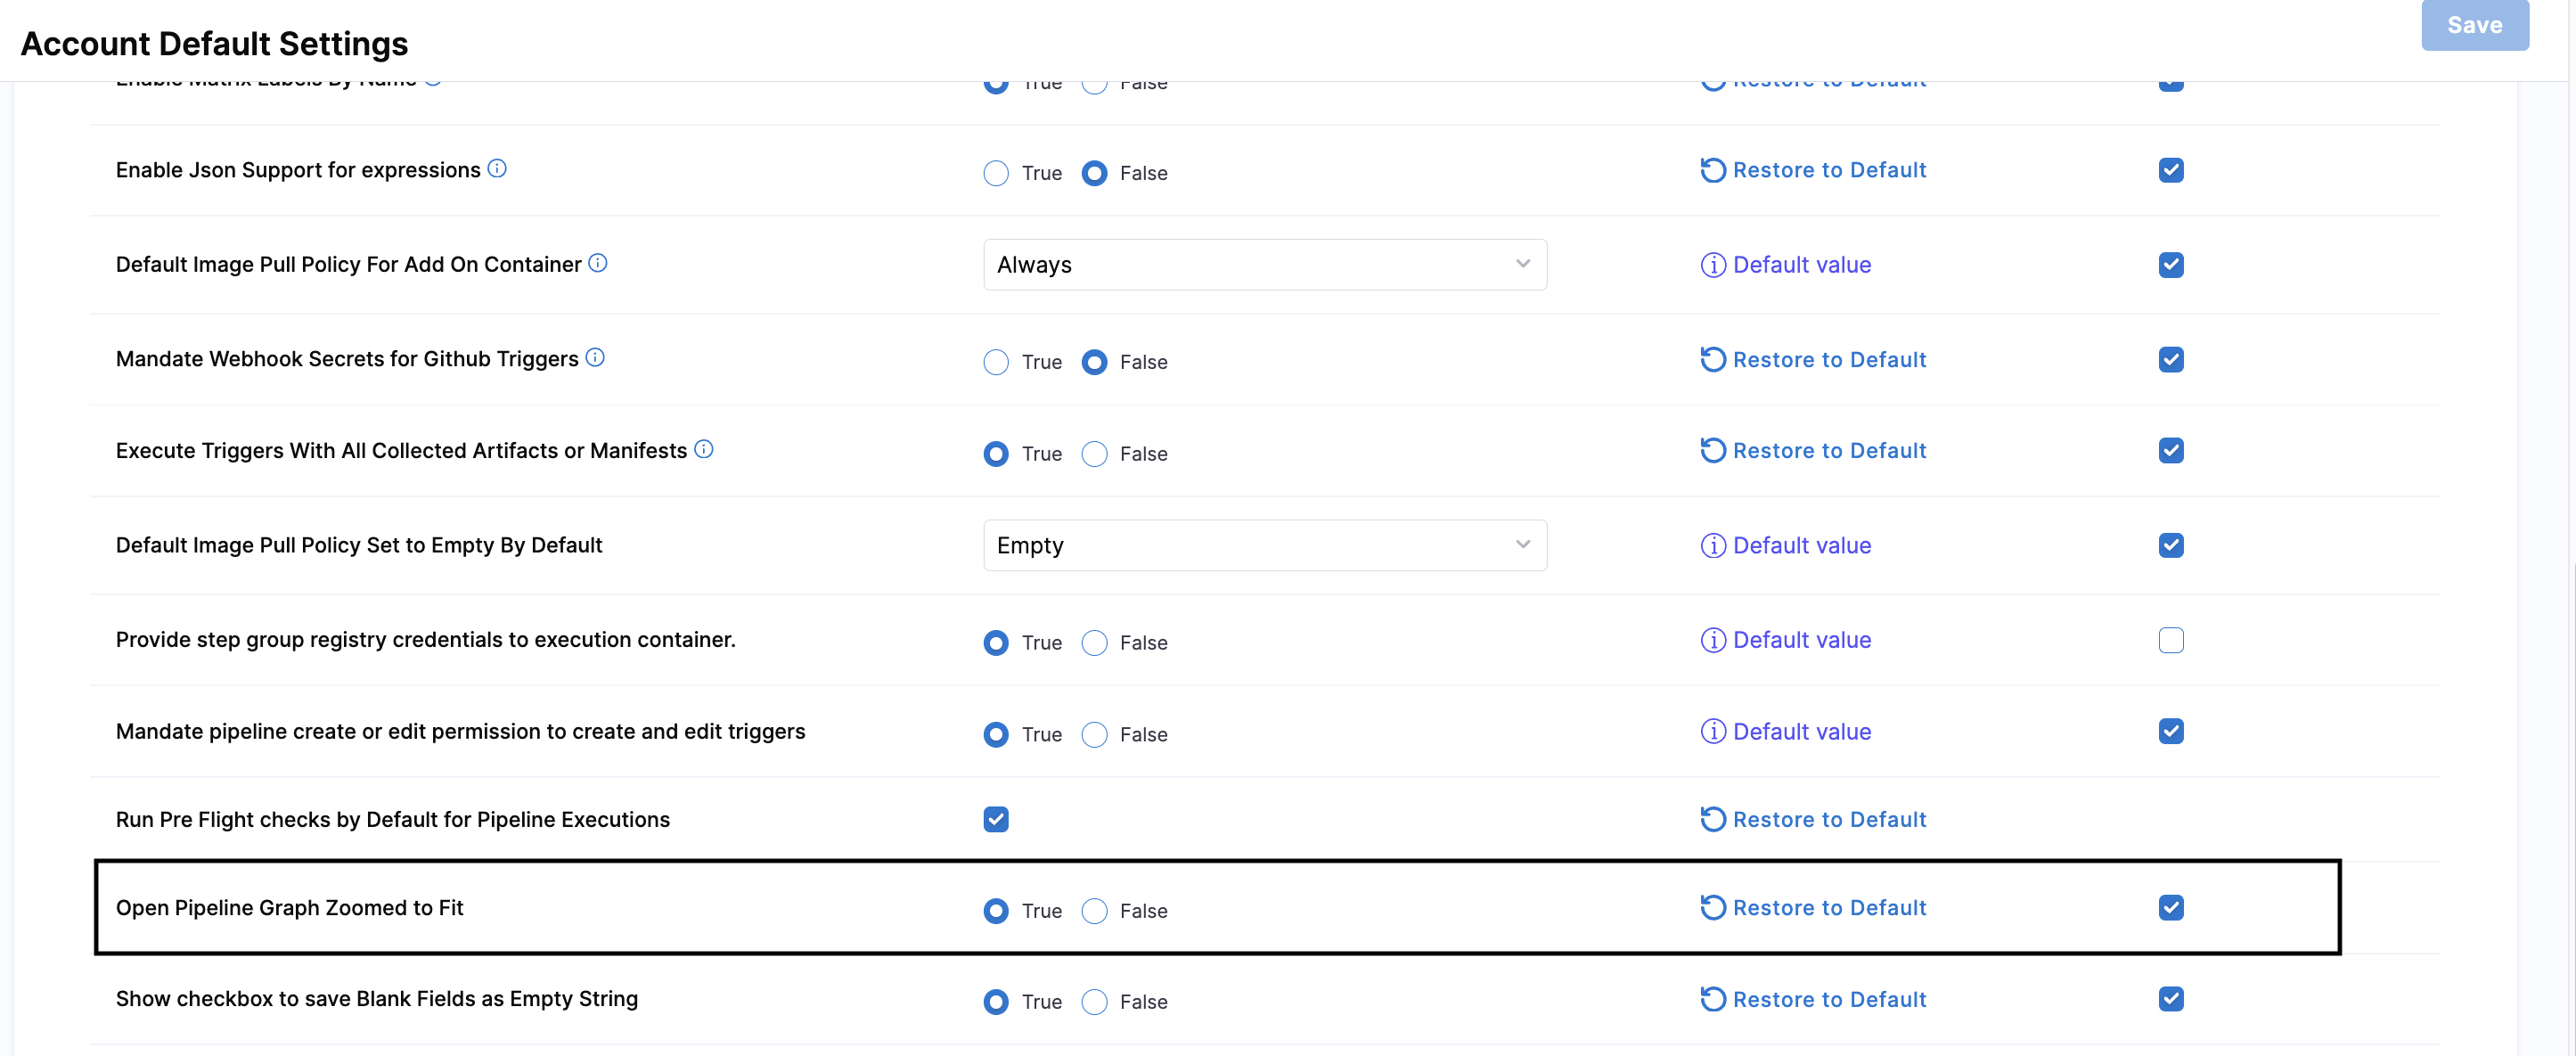
When Open Pipeline Graph Zoomed to Fit is set to True, the pipeline graph in the Pipeline Studio Visual editor and the graphs in the pipeline execution view open zoomed to fit by default.
To use the standard pipeline graph zoom instead, set Open Pipeline Graph Zoomed to Fit to False.
Preserve the pipeline graph zoom level
In the Pipeline Studio Visual editor, you can adjust the pipeline graph zoom level using the graph controls, including Zoom to Fit.
When you change the zoom level for a pipeline, Harness preserves your selection when you:
- Switch between the Visual and YAML editors.
- Navigate between the pipeline and its execution view.
- Navigate to another page and return to the pipeline.
In the pipeline execution view, Harness also preserves the selected zoom levels for both the pipeline graph and the selected stage's step graph.
The zoom level is stored separately for each pipeline in your browser. It is not shared across browsers or browser sessions. When you use a different browser or start a new browser session, the pipeline graph uses the configured default zoom setting.
Fixed pipeline settings
You cannot modify these pipeline settings.
Parallelism limit
The parallelism limit is the number of parallel steps or stages that can exist at a given level in a pipeline, regardless of whether you use a matrix, parallelism looping strategy, or manually arrange the steps/stages in parallel.
This is a fixed limit applied at the account scope and it cannot be modified. If you manually enter an invalid value in a pipeline's YAML, you can save the pipeline, but you will not be able to run it.
The following parallelism limits apply to each plan:
- Free plan and Team/Enterprise trials: 10
- Team plan: 256
- Enterprise plan: 256
For example, with a Free plan, you can add a maximum of 10 parallel stages in a pipeline, and you can add a maximum of 10 parallel steps in each of those stages.
Even if you specify a maxConcurrency limit of 5 or 10, the moment you do the looping repeat strategy, Harness will already compute the total number of potential stages, if the list generates more than 256 items we will fail there before even running any of the stages and honoring the maxconcurrency.
Execution limits
| Resource | Use-case | Default Limits |
|---|---|---|
| Step | Inputs size for a step |
|
| Step | Output size for a step |
|
| File Store | Size of the file store |
|
| Triggers | Size of payload supported by triggers |
|
If you need limits beyond the default values specified above, contact Harness Support.
Resolved YAML size limit
Compiled YAML cannot exceed the Harness-enforced limit of 3 MB.
Compiled YAML refers to the final YAML file generated for a pipeline with all templates resolved. To find compiled YAML for your pipelines, go to View and compar pipeline executions.
Even if your base pipeline YAML is only a few kilobytes, if the pipeline pulls in a larger-sized template, the total compiled size will be larger (calculated as base pipeline YAML size + Template size).
Exceeding this limit produces an error message.
Queue limit on concurrent stage processing
Harness has a fixed concurrent and queued stage limit of 20 stages. This means if you have several stages running at the same time and consuming pipeline resources, any additional stages that requires the same resources start queueing. If the queue is full, then additional stages fail.
For example, assume a pipeline tries to run 25 stages concurrently, and each stage takes approximately eight hours to complete. Resource consumption by these stages blocks other stages from using those resources for that duration. Harness starts running as many stages as it can based on the available resources and then begins queueing stages, up to a maximum of 20. Once it reaches the concurrency + queued limit of 20 stages, additional stages fail. In this example, five stages would fail by default of the concurrency and queue limit being full.
Individual pipeline and module-specific pipeline settings
For individual pipeline settings, such as stage and step settings, pipeline triggers, and so on, go to the documentation for the topic of your choice. For example:
- Harness CD
- Harness CI pipeline creation overview
- Harness CI Intelligence
- Triggers
- Pipeline failure handling, timeout limits, and retries
- Conditional executions
- Pipeline chaining
Next steps
- Handle empty strings in input variables: Walk through the Save Blank Fields as Empty String settings with a full example.
- Configure Default Settings: Manage account, organization, and project default settings.
- Use looping strategies: Configure matrix, repeat, and parallelism, which pipeline concurrency limits affect.