Introduction
This knowledge base article discusses how setting up a webhook sync can help prevent reaching the Bitbucket API rate limit issue.
API rate limits, what causes them?
Bitbucket Rate Limits are the number of API requests that you can make within a specific amount of time (1 hour according to current documentation). Sometimes, the number of API requests in a specific period of time is high and it stops remote entities from working. The rate limits are divided into 1-hour rolling windows for the calls.
Error Messages
Errors messages from Bitbucket that can come from this categorization include:
Response message: Please try these out:
1. Please try and rotate your tokens used for GIT operations.
2. Please check your rate limits with your BitBucket GIT provider
                  Rate limit reached on BitBucket provider.
                  Failed to perform GIT operation.
errorMessage: "Failed to fetch file [path/to/templateorpipeline.yaml] from Bitbucket due to error : No commit found."
For more information about the different types of limits from Github, please see the following
Easing Bitbucket API Limits with a Webhook Connection
Without a webhook connection, changes made on either the Git repository or Harness are automatically synchronized, but each piece of the pipeline stored remotely in Bitbucket will necessitate an API call. For example, input sets, templates, each connector, may be stored in Bitbucket and will need to be reconciled and refreshed. This can quickly add up to a lot of calls to Bitbucket that will affect even those with authenticated accounts
When a webhook connection is established, files are cached at Harness's end, creating a copy of the Harness files in the repository. Instead of making frequent requests to the Bitbucket API for every operation, the system can rely on the cached data for all tasks, thus limiting the risk of reaching API limits.
Setting up a webhook for caching
To set up caching with your Bitbucket repo, you can utilize the following setup process
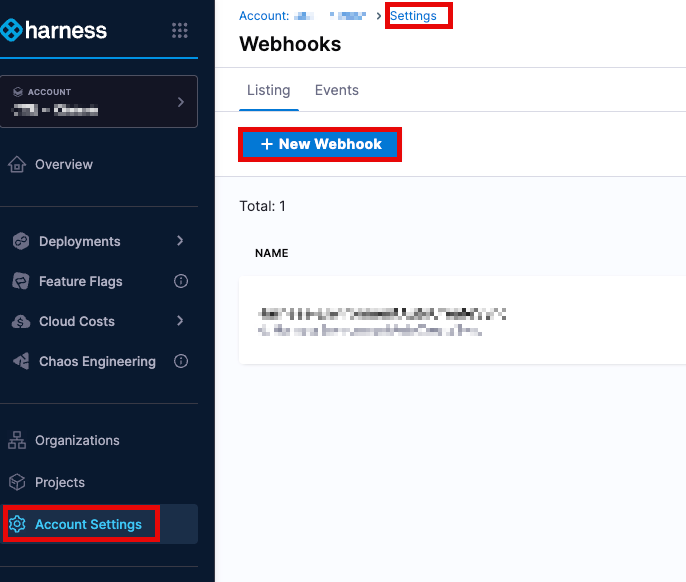
Account Level:
Account Settings → Account-level Resources → Webhooks → New Webhook
 Organization Level:
Organization Resources → Organization-level Resources → Webhooks → New Webhook
Organization Level:
Organization Resources → Organization-level Resources → Webhooks → New Webhook
Project Level: Project Settings → Project-level Resources → Webhooks → New Webhook
Webhook Configuration Steps
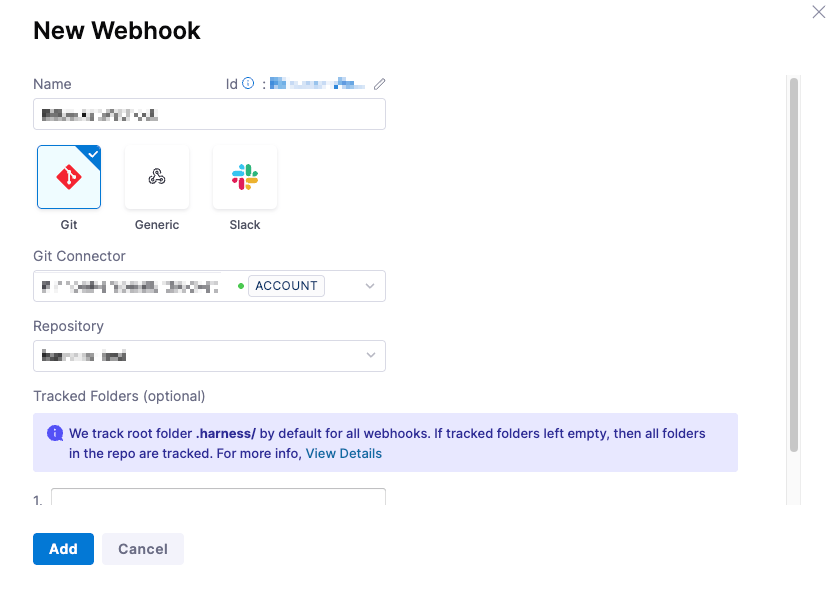
- Provide the appropriate name for the connector and select
Gittype of Webhook - In the Git connector, select the Bitbucket connector that you have already created. To establish a connector, please review the Harness Article on Bitbucket Connectors.
- In Repository, select the Bitbucket repo where your Harness entities are stored. Please note that if you are storing your entities in more than one repo, you will need to create a separate webhook for each repo.
- In Folder Path, specify the directory (e.g., .harness/). This is optional, and if none are selected, all folders will be utilized
Harness tracks the .harness folder by default in all webhooks.
- Click Add to register the webhook.
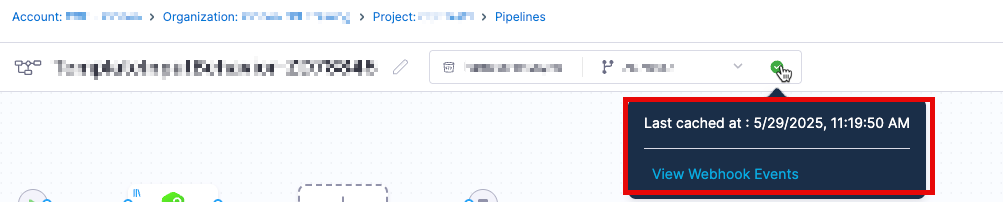
- Once synced, events appear in the Events tab under Webhooks, including event IDs for troubleshooting.
- Entities that are being synchronized will have a green dot that will show the last synchronization
- Currently the file cache duration is set to 30 days.
- Customers are recommended to create a webhook at the account level so all pipelines pulling from the repository can enjoy the benefits of the cache
- Customers may still have a possibility of encountering issues depending on the amount of changes being pushed/made in each commit
- Each repository will need to have a webhook established. For example, setting a webhook up for repository
abc123corpwill not cache data fro the repoharness123in Bitbucket
Connectivity loss
Customers may be naturally curious about what might happen in the event of a potential network outage between Harness and the entity repository provider. In this case, several scenarios need to be considered. In general, while the connectivity is broken, Harness will utilize the "locked" cached version of the entity.
Updates to remote entities at the remote entity repo
If autocreation is enabled, new entities will not be created automatically and must be imported manually. Another option would be for customers to recreate the file once the connectivity is fixed. For existing entities, we provide an option to Reload from Git where customers can manually reload from the repository once the connectivity is restored.

At a base level, if the entities' .yaml files are updated in the remote repository while the connection is broken, the webhook event will never reach Harness, and the cache we maintain will never be updated. Customers should be able to see both the attempt to reach Harness and the failure to reach Harness within the repository logs.
Updates to remote entities from the Harness UI
If the connectivity is broken, customers will not be able to make changes to the entity locally. The create, edit, or delete operation will fail, and the cache will not be updated. The following error message may appear when attempting to update. This is because, as part of storing a remote entity, Harness cannot update the remote entity at the repo, resulting in the failure.
Harness Executions - no changes or updates
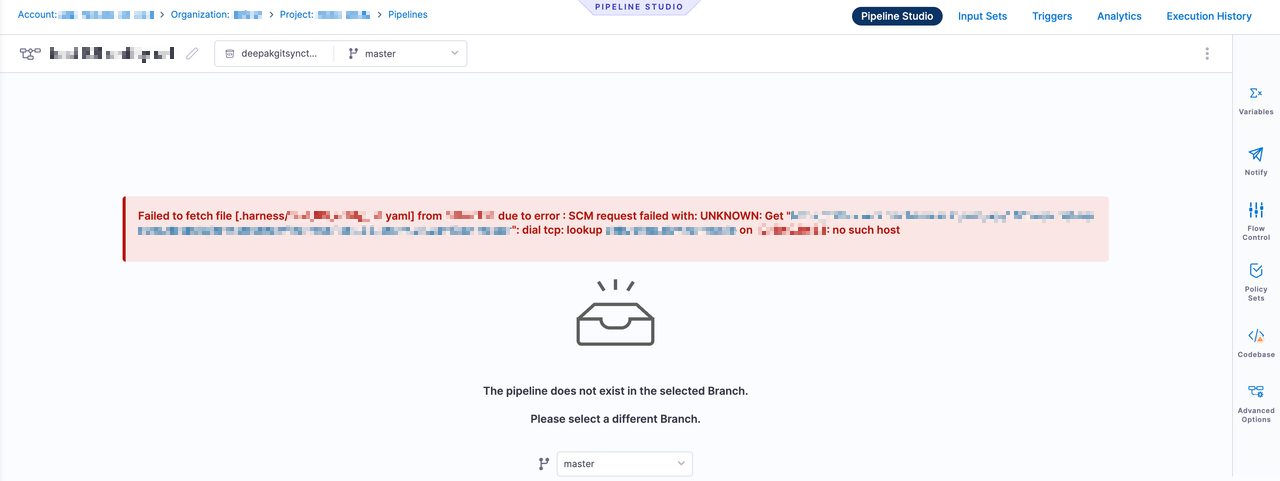
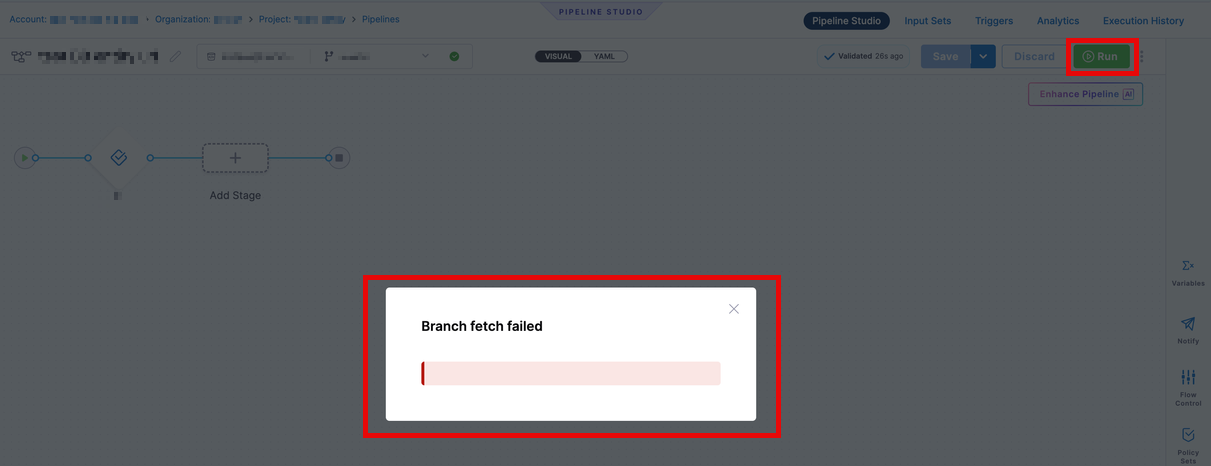
For existing entities, if the connectivity is broken, the pipeline will continue running and reference the last cache version of the entities during execution. This includes any remote entities that were kept in the remote repo. Harness maintains a cache with an expiration, and as long as the cache hasn't expired, users will see a Branch Fetch Failed error, but will still be able to execute the pipeline.
If we don’t have a cache for the pipeline or it has expired, our end users will see a page where the pipeline is not visible, as shown in the screenshot below.
Any updates made during the downtime period will not be reflected in the execution. Basically, the cache has an effective "read only" state
Cache Expiry
Please note that while the cache remains effective, the cache's existence and each individual object's existence is reliant on a couple factors
Overall Cache Existence
The Harness webhook cache as a whole, will exist so long as the webhook for that particular cache remains unmodified. For example, deleting, modifying, or disabling a webhook will cause the entire cache to be flushed, and therefore, all objects in the cache will disappear. So for example, if a customer deletes a webhook while there is a connectivity error to the host respository, and attempts to re-create the webhook, the existing cache will be deleted and then a new cache will need to be built.
This will mean that no executions can occur again until the cache is re-established
Individual Objects Existence
As stated, each cached object has a lifecycle of 30 days. As a result, each object has their own timer for when the object will expire and need to be re-cached/re-fetched from the source repository. This timer is reset every time the objected is re-cached either because of its expiry, or because of changes that have happened to the object.
If during the connectivity issues with the code repository a particular object in Harness requires a re-cache and is unable to, the object will be show up as being inaccessible or missing.
In summary:
- Each entity has a cache expiry of 30 days for the last event for the file.
- This cache date would be different for each cached item (e.g., the pipeline itself, could have a different cache expiry date from each individual template used in the pipeline)
- If at the time of a cache refresh, Harness is unable to refresh the object, the cached item will have expired and appear to "not exist" in Harness. Once connectivity is re-established, customers can either manually force a re-sync, or the webhook cache will be rebuilt/recovered as a part of Harness' scheduled tasks